Connect Automation
Introduction
Connect Automation is an integration between Event Manager and your Building Automation System. It allows building automation services such as HVAC (Heating, Ventilation, and Air Conditioning), access control, and lighting to be automatically controlled and/or scheduled for approved events using a unified platform. This can help remove the guesswork of renting facilities, eliminate double data entry, and allow you to handle last-minute changes or event cancellations.
NOTE If you are interested in using this feature, please contact Client Services for more information.
Event Manager works in sync with the client's Building Automation to enable the integration with the Building Automation System (BAS). It helps to streamline events, facility management, and eliminates time consuming manual processes.
NOTE Event manager can integrate with any BAS system utilizing BACnet/IP Devices or Niagra.
Benefits
Automation provides the following benefits:
-
Prevents energy waste by ensuring that the systems are active only when necessary based on event schedules and occupancy.
-
Enables schools to save time and reduce cost.
-
Performs the tasks that previously required constant staff intervention.
-
Enhances energy efficiency and sustainability
-
Event spaces remain comfortable for attendees and enhances the experience for organizers and participants.
Prerequisites for the Integration
-
On the Event Manager application, you require access to the External Integrations options available on the Global Administrations tile on the Settings page. For this, the Integration permission must be enabled for your tenant.
-
A professional or enterprise package is required prior to initiating the integration with BAS.
Event Manager Setup
To configure the Event Manger application for integration, the first step is to add a new device and activate it for integration with the Business Automation System (BAS).
Click the following links to learn more about each one of them.
Adding a New Device
To add a device to Event Manager for integration with Building System Automation:
-
Log on to Event Manager.
-
Navigate to Dashboard > Settings > External Integrations.

-
Click the Building Automation tab.

-
Click Add New Device.
-
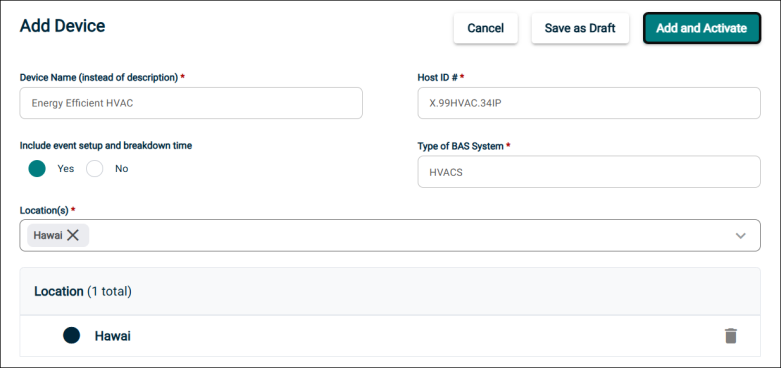
On the Add Device page:
-
In the Device Name field, enter the device name.
-
In the Host ID # field, enter the Host ID provided by the building controls and solutions team.
-
For the include event setup and breakdown time, select Yes to schedule the automation system based on event setup and breakdown time.
NOTE By default, the system is scheduled based on event start and end time.
-
In the Type of BAS System field, enter the name for the BAS system that you are using. Multiple options must be separated by a comma.
NOTE Device Name and Host ID # are unique for every client. The Device name, Host ID, and Type of BAS system fields accept a maximum of 255 characters.
-
Click the Location(s) dropdown list and select the locations where automation is enabled. To select all the locations, click the Select All check box.
NOTE A single location cannot be used on more than one activated device.
-
-
To start sending events, click Add and Activate. Only approved events that have not passed the current date and time are sent to schedule the automation.
NOTE To save the setup without enabling the integration, click Save as Draft. The name of the device is displayed along with the word Draft on the Device List page. Later on, you need to click on View/Edit under Actions to activate the device for sending approved events to the automation system.
Device Actions
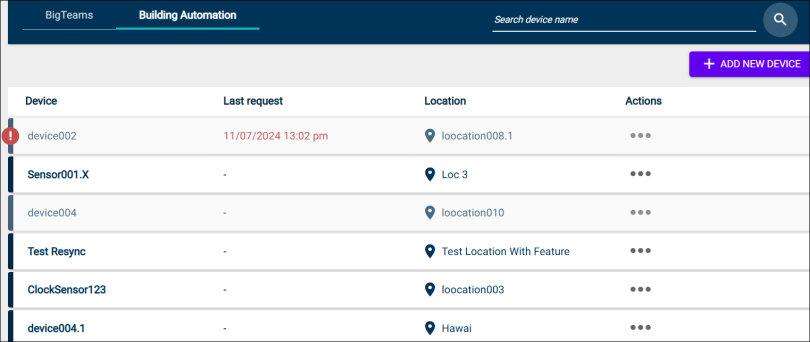
On the Building Automation page, the Actions column lists the actions that are available for your device. For activated devices, the following actions are available and for devices in draft mode only the View/Edit option is available.
NOTE To make changes to the device, the Integration permission must be enabled for your user.
Click the following links to learn more about each of these options.
View / Edit
The View / Edit option is available for all the devices on the Device List page. It provides useful information and updates about your device. On the Device List page, under Actions click View / Edit. The page that is displayed has three tabs. Let us learn more about each of them.
-
Information tab: Provides device details that were capture at the time of setting up the device.
-
Save & Activate: If you have saved your device in Draft mode, you can click Save & Activate so that approved events can be sent to BAS to schedule the automation.
-
Deactivate: You can stop using a device by clicking the Deactivate button.
-
Resync Failed Locations: Click this button to resolve a sync issue that the device has encountered with any location
-
-
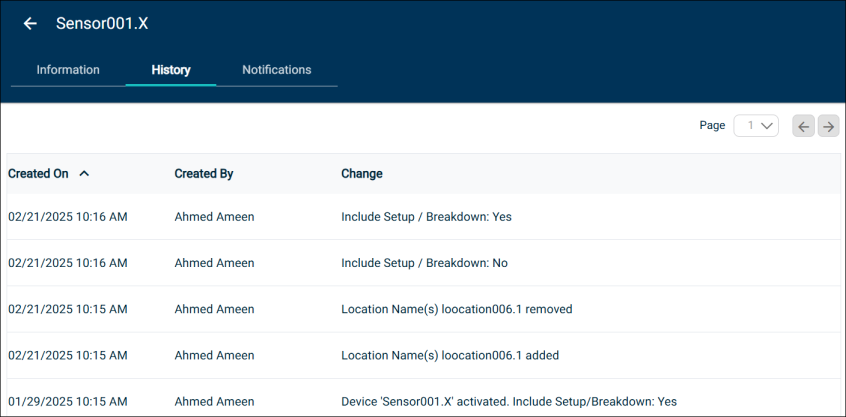
History tab: Provides device history which includes the following:
-
Device creation date and time
-
Name of the user who has created the device
-
Device activation status
-
Is automation scheduled based on event setup and breakdown time or not
NOTE When a location is added or deleted or the option to include setup or breakdown time is updated, a new record is created under the History tab.
-
-
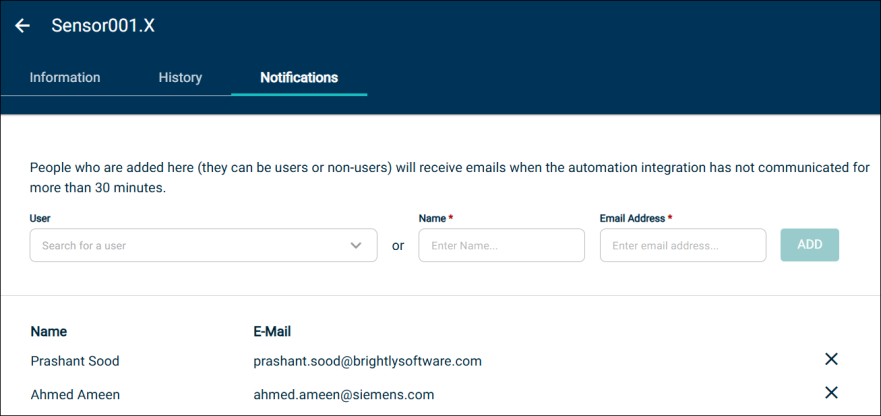
Notifications tab: You can provide the name and email address of users under this tab. For activated devices, when more than 30 min have elapsed since the last time automation communicated with Event Manager, the user(s) will receive an email notification so that they can take action.
For more information click here.
Deactivate
When a device needs to be replaced or automation needs to be discontinued, the deactivate option can be used.
To deactivate a device:
-
Access the Building Automation page.
-
Under the Actions Click the Ellipsis icon.
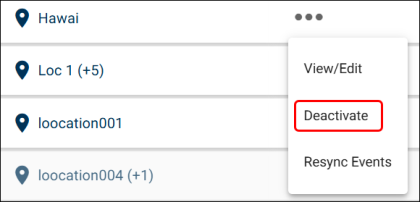
-
Click Deactivate.
-
On the Deactivate Device popup, click Confirm.
NOTE When you deactivate a device, automation is disabled for all the locations that are associated with the device. A device that is deactivated cannot be reactivated.
Resync Events
This option is used to remove all automation requests for all events for the device. You need to manually cancel the request for events where automation was previously cancelled.
To resync events:
-
Access the Building Automation page.
-
Under the Actions Click the Ellipsis icon.
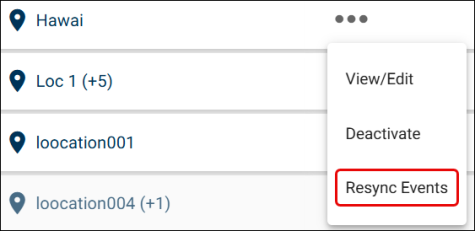
-
Click Resync Events.
-
On the Resync Events popup click Confirm.
Last Request Date
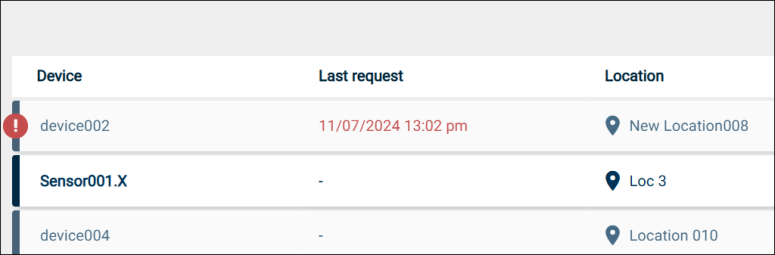
The automation system communicates with the Event Manager to retrieve events every 5 minutes. The Last Request column shows the latest date and time when automation has contacted Event Manager. If 30 min have elapsed since the last communication with Event Manager, the date and time are shown in red. A dash is displayed when a device is either not activated or communication has never been established with the Event Manager.
Building Automation Event Updates
Automation Status
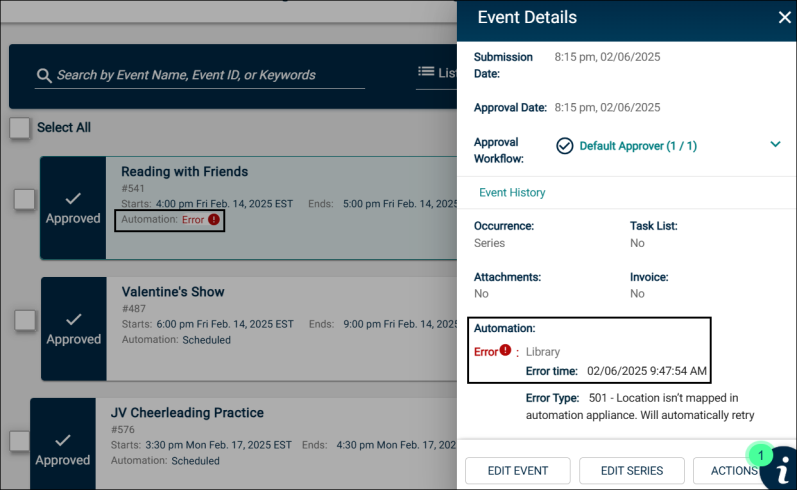
The automation status for the events sent to the Building Automation System (BAS) is displayed on the Event List page. You can view the status on the respective event tile and in quick view by clicking on an event as shown in the following screenshot.
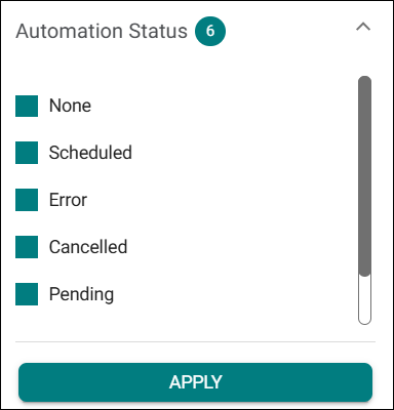
Automation Status Filter Options
On the Events List page, a new filter category Automation Status is added with the following options. There is no change to the existing event filter functionality.
-
None
-
Scheduled
-
Error
-
Cancelled
-
Pending
-
Pending Cancellation
Event History
Event history is created by adding a new entry each time the automation status is updated. It has a new icon with the word Automation to indicate that it is for an automation event. The event history shows all status types.
To view the history for an event, click the event tile on the Events List page. On the Event Details popup, scroll down and click the Event History link. 

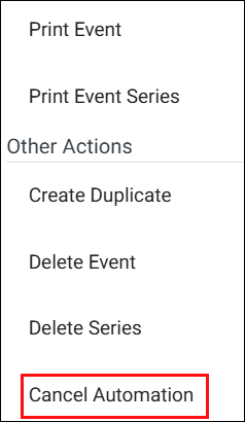
Cancel Automation
The event admin can cancel the automation for an event when it is not needed using the Cancel Automation option. For events that are planned at multiple locations, the system will prompt you to select the location(s) at which automation needs to be canceled.
To cancel the automation:
-
Navigate to Dashboard > Events > Events List.
-
On the Events List page, click the Actions dropdown list for an event.
-
Select Cancel Automation.
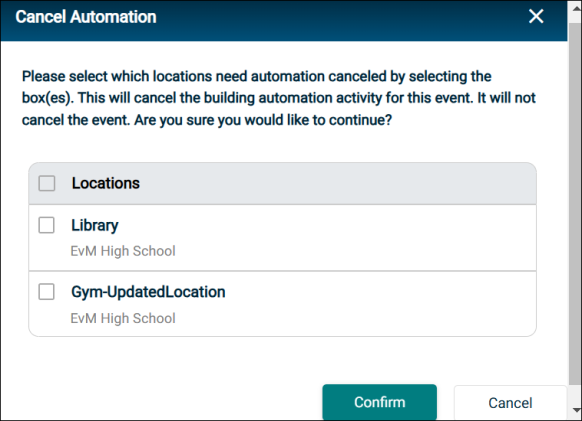
-
On the Cancel Automation popup, select the location(s) where automation needs to be canceled.
-
Click Confirm.
NOTE The Cancel Automation option is used to cancel the building automation activity for an event. The event is not canceled and will have to be manually administered.
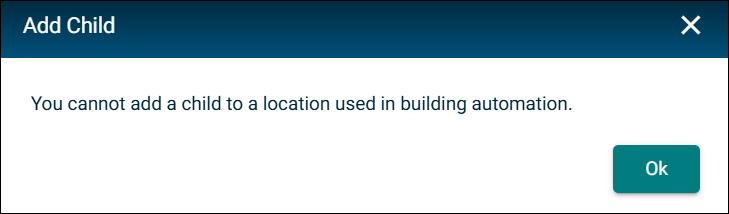
Upgrading a Child Location with Automation
Navigation: Dashboard > Settings > Site Administration / Global Administration) > Locations
As an admin user, you cannot promote a child location (with automation enabled) to a parent location. On a child location, when you click the Add Child link, a popup is displayed to inform that the location is used in building automation due to which a child cannot be added.
NOTE This restriction is applicable to both site and global locations.
Benefit: This change is aimed at ensuring that changes made to the location do not have a negative impact on the automation.
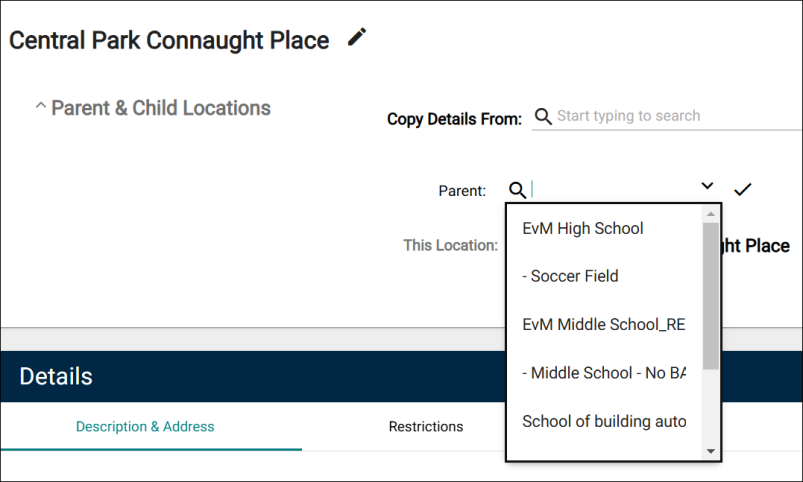
Enhanced Parent Search Functionality
When you add a location by clicking the Add Location button, On the Location Details page the Parent dropdown list will not display child locations that are used by building automation.
NOTE This change is applicable when you add a location by selecting the option either under the Site Administration or the Global Administration tile.
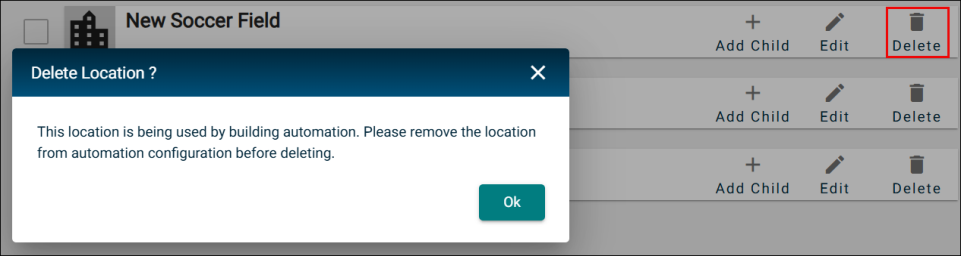
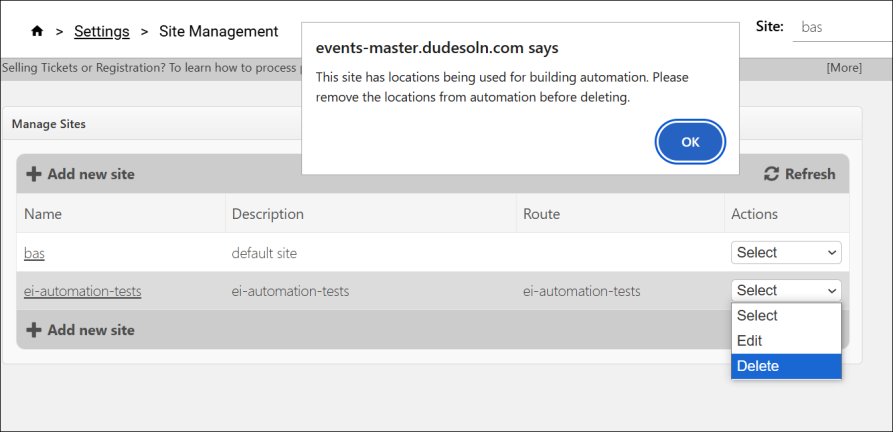
Restricted Site and Location Deletion
Under this enhancement, the following changes are made:
-
Locations that have automation enabled cannot be deleted. To delete the location, remove the automation configuration prior to attempting the delete action. This applies to locations created using the option available under the Site Administration and Global Administration tiles.
-
Sites that have one or more locations using automation cannot be deleted. To delete the site, remove the automation configuration from all such locations and then attempt the delete action.
In the above scenarios, when the user attempts to delete the site or location; a popup is displayed to inform that automation configuration is active on a location which must be removed before the site or location can be deleted. Refer to the following screenshots.