Back to Event Manager Main Menu
Configuring Location Settings
There are a number of options available for you to configure Locations within Event Manager, including Location Setups, Features, Usages, and Types.
- Click on Settings from the navigation menu.
- Click on Locations under Site Administration or Global Locations under Global Administration.
- Click on Location Settings.
Location Setups and Features can be used to define the room configurations and options available for users who want to book a particular location.
NOTE If you do not currently have access to this feature, contact your sales representative or client services for more information.
Location Setups
Location Setups represent different ways that a room can be set up for an event.
To add a Location Setup:
- Click on the Add A Location Setup button from the Location Configurations panel.
- Enter a Name for this setup.
- If necessary, you can Upload an image, link a URL from the internet, or Choose From Library to provide a picture or graphic.
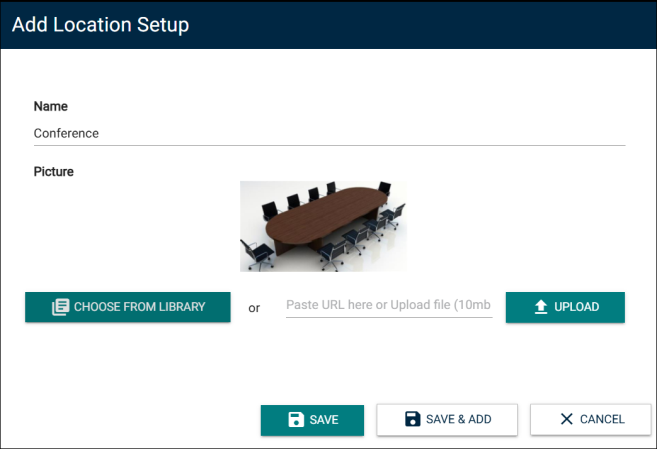
- Enter a Description of this setup.
- Under Default Setup Time and Default Breakdown Time, you can enter a value and select either Minutes or Hours. This will automatically populate the Setup and Breakdown fields on the event request form.
- Enter any Additional Fee that should be charged for events that use this setup. This is useful for setups that are especially difficult or require the rental of additional equipment to accommodate the configuration.
NOTE If you entered an Additional Fee, select either Flat or Hourly from the Fee Type dropdown list.
-
Enter the Capacity associated with this setup.
NOTE The Capacity listed here will be set as the default capacity when a room setup is added to a location, but can be adjusted as needed.
- Start typing or click to select the task Type for tasks created for this setup.
- Select a Priority for tasks created for this setup.
- Optionally, select the Only create setup tasks check box.
- Click Save to finalize the changes, or Save & Add to finalize the changes and add another setup.
NOTE When you add or edit a location setup, the Only create setup tasks check box is cleared by default. Selecting the check box ensures that only a setup task gets created when the location setup is used for an event. Later on, if the check box is cleared both setup and breakdown tasks will be created for all subsequent events where the location setup is used.

Features
Features represent items or attributes that are available for locations in Event Manager, such as stage lighting or a projector.
To add a Feature:
- Click on the Features tab from the Location Configurations panel.
- Click on the Add a Feature button.
- Enter a Name for this feature.
- Under Default Setup Time and Default Breakdown Time, enter a value and select either minutes or hours. This will auto-populate the Setup and Breakdown fields on the event request form.
- Enter any Additional Fee that should be charged for events that use this feature. This is useful for features that are difficult or require rental of additional equipment to accommodate the configuration.
- In the Max Event Request field, enter the limit for this feature. This is the maximum amount that you can request for each event.
- From the Fee Type dropdown list, select Flat or Hourly. Select an option only when there is an additional fee.
- Start typing or click to select the Task Type for tasks created for this feature.
- Select a Priority for tasks created for this feature.
- Optionally, select the Only create setup tasks check box.
- Click Save to finalize the changes or Save & Add to finalize the changes and add another feature.
NOTE The Additional Fee is shown on the form.
NOTE Task Type is required if you want tasks to be created automatically when this feature is selected on an event request.
NOTE When you add or edit a feature, the Only create setup tasks check box is cleared by default. Selecting the check box ensures that only a setup task gets created when the feature is used for an event. Later on, if the check box is cleared both setup and breakdown tasks will be created for all subsequent events where the feature is used.

Features Associated with Fees
Features represent an important functionality in the Event Manager. They are essential for efficiently conducting an event and can be associated with a fee. Therefore, they play an important role in increasing revenue on one hand and provide transparency to the requestors regarding the actual cost of an event.
The user interface is enhanced so that admins can specify whether a feature is billed at a flat rate or hourly basis. They can also define the maximum limit for requesting a feature.
On the event form, when you can view the fee associated with a feature and also select the amount for a feature. If the estimate is turned on for an event form, when you select the value for the amount you will be able to see the cost estimate getting updated on the screen in real time. This provides greater visibility and helps reduce the effort involved in invoicing for an event.
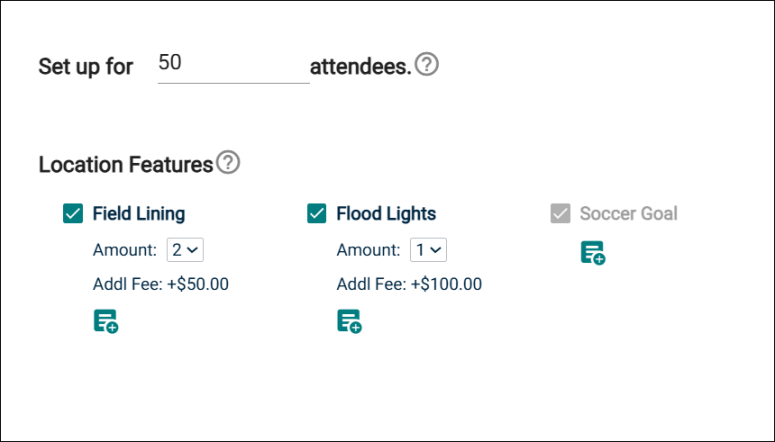
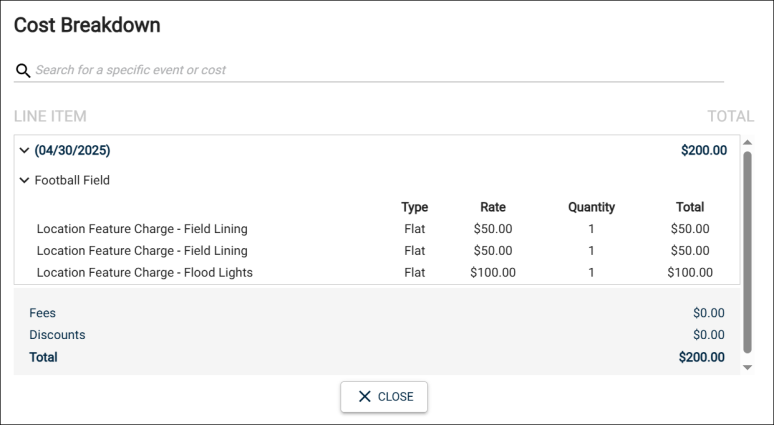
If a feature is marked as fixed for a location, the associated fee is not shown on the screen and it is also not added to the cost estimate. Event invoices where there are features with associated fees automatically contain line items associated to such features as shown in the following screenshot.
In order to accurately define the purpose(s) for each Location, they can be assigned Types and Usages.
NOTE These settings are only required if you have access to the Community Portal feature.
Location Types
Types are used to represent the physical characteristics of a space, such as a practice facility or convention center.
To add a Type:
- Click Add a Type.
- Enter the Type in the panel.
- Click Save.

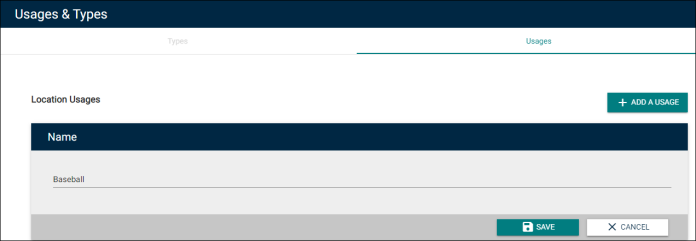
Location Usages
Usages are a representation of the types of events that a facility or space would be used for, such as soccer, team practice, or theater performance.
To add a Usage:
- Click on the Usages tab from the Usages & Types panel.
- Click Add a Usage.
- Enter the Usage in the panel.
- Click Save.