Back to Event Manager Main Menu
Creating an Event Request
Once you have been approved as a community portal user, you will be able to create an event request. Event forms are customizable, so the form you use to create an event may not include all components listed here. If you have questions about filling out the event form, contact your community administrator.
Watch the Video Tutorial:

How to Create an Event
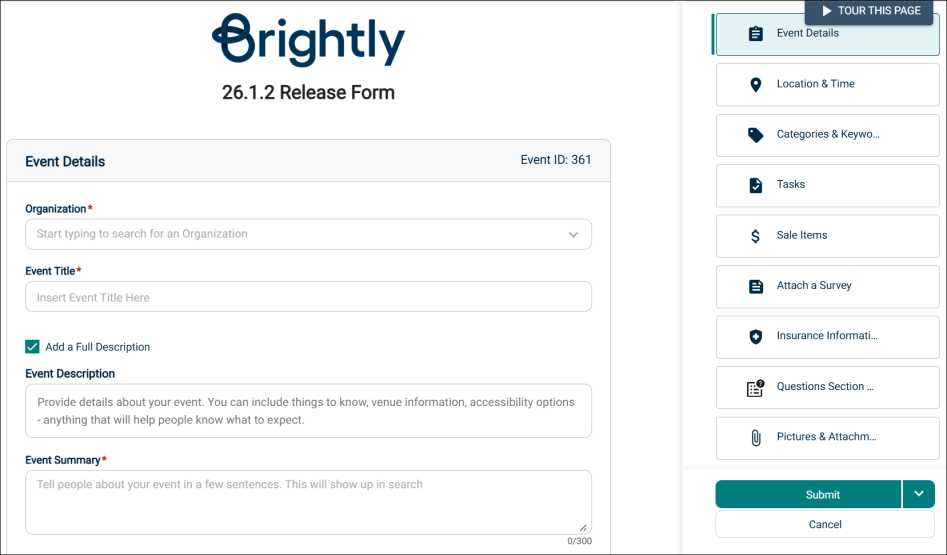
In order to create an event you will first need to search for an available location. Once you have checked availability, you will be brought to the event form.
- From the Organization dropdown list, select your Organization.
- In the Event Title field, enter an Event Title.
- To enter an event description, select the Add a Full Description check box and enter a description in the Event Description text box.
- In the Event Summary text box, add a Summary. This will show in search results.
- Click Submit.
NOTE You will only be able to select Organizations that you have been added to as a member.
NOTE When the Required check box is selected by the tenant administrator on the event request form, the Event Description text box is visible and the Add a Full Description text box is not displayed.
NOTE Event Description and Event Summary boxes can be expanded by dragging the three lines on the bottom right corner of the text box. The Event Summary text box accepts a maximum of 300 characters. A counter is provided that shows the updated count dynamically as you add and delete characters.
NOTE The event description is shown on the public calendar whereas the event summary is not.
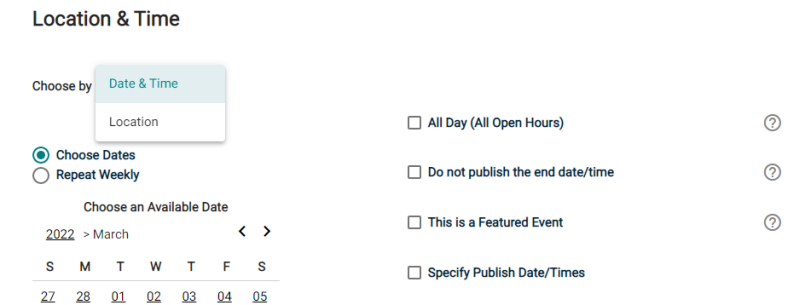
An event's location and time can be selected in four different ways. Search for availability by location, or by date and time, and then determine if your event will only last a certain number of hours, or if the location should be reserved all day. *Note: An All Day event is from 12:00 AM to 11:59 PM for each day the event occurs. Each of these ways allows you to choose between a single event occurrence, or a repeating event series.
- Select the desired Location from the drop down menu.
- Click Location Search in the Locations You've Selected panel.
- Search or filter the list and check the box next to each location needed for this event.
- Click Save.
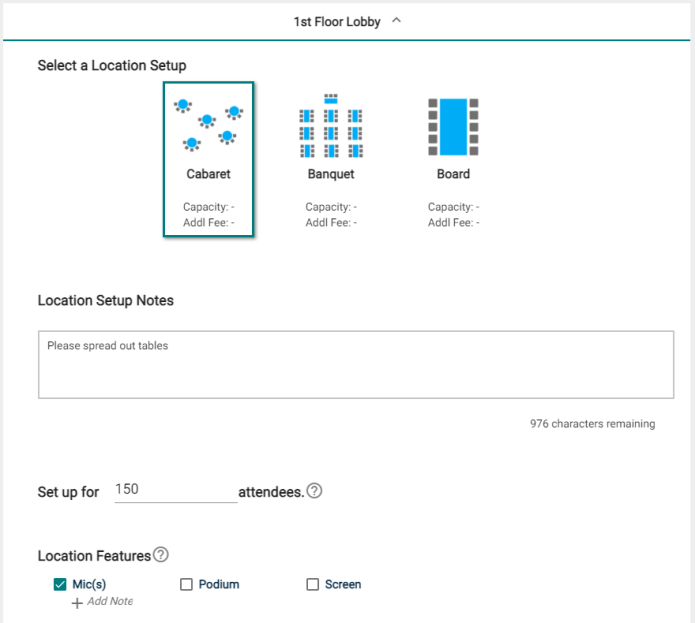
- Click on the desired Location Setup for this event. The Capacity and Additional Fee (if any) for setup is displayed beneath each option.
- Enter any Location Setup Notes needed for each selected Location. *Note: If no room configurations are available for the selected Location, you will need to click the name of the location to expand this panel before entering any notes.
- Enter the number of attendees.
- Check the box next to any desired Location Features, such as Stage Lighting or a Podium. *Note: If a feature is grayed out, it is fixed to the location and cannot be removed.
- Click Add Note under a Feature to add details or instructions for the selected Feature.
- To add a location that isn't listed, click Add a Custom Location and enter the name of the location needed.
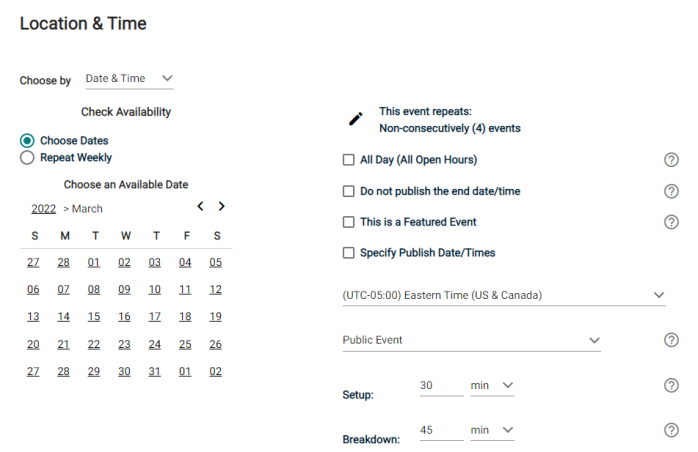
- Once the locations are selected, the Date & Times Available For The Selected Location(s) will populate any time slots that are already reserved.
- Navigate to the start date needed for your event.
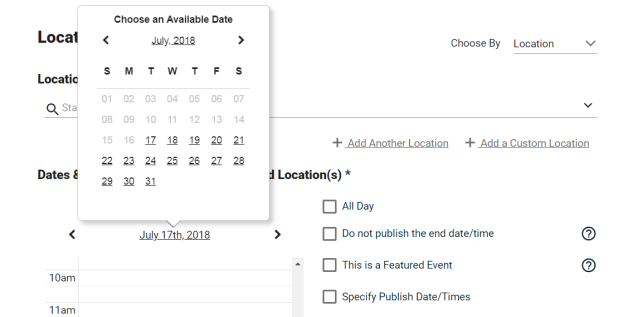
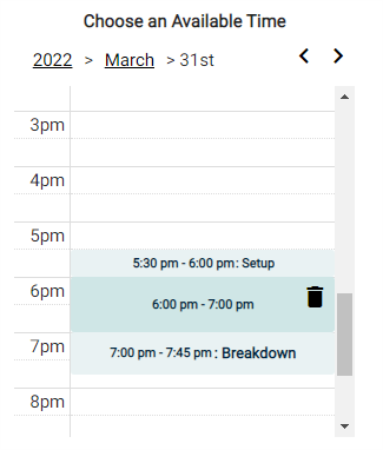
- Select the time you need by clicking on the appropriate start time on the calendar. Drag the time slot to be the appropriate length. *Note: Any times that are unavailable will show with a block marked Reserved. This means the time has been booked with another event.
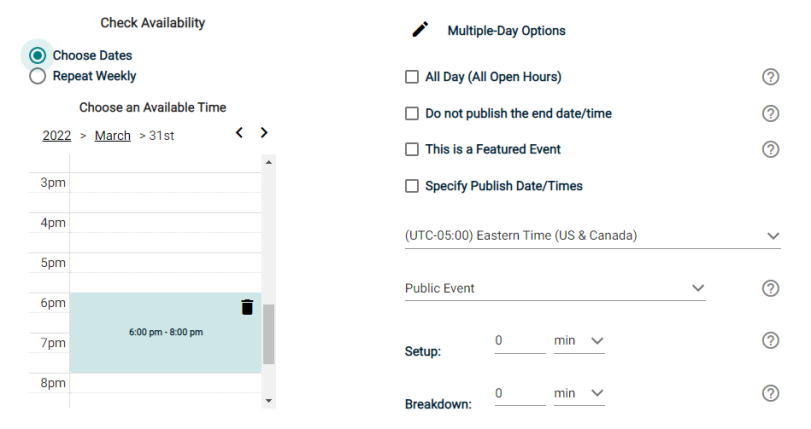
-
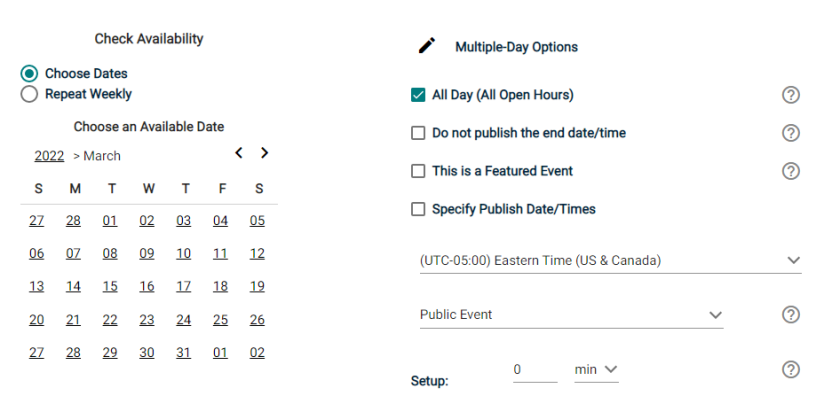
If your event will repeat, click on the pencil icon next to Multiple-Day Options. *Note: This option will only appear after you have selected a time on the calendar.
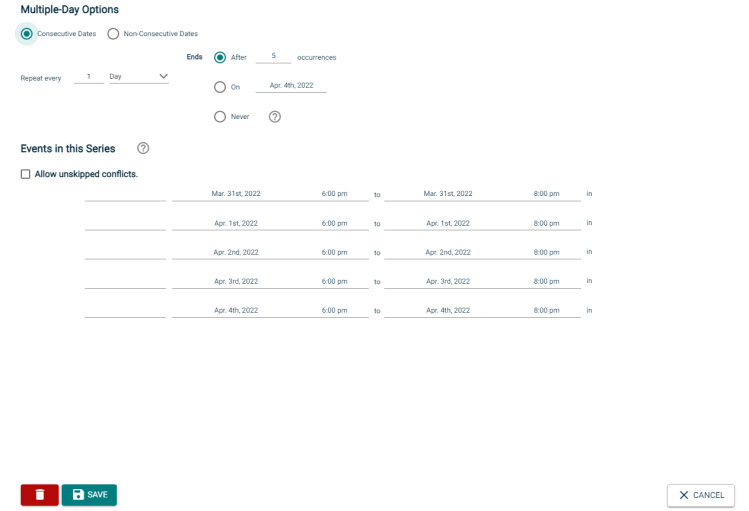
- Choose between Consecutive Dates and Non-Consecutive Dates.
- If you chose Consecutive Dates, choose how often the event repeats, and when the event series ends. After choosing the event pattern, the Events in this Series will populate. Any necessary adjustments can be made here before saving, including the event name, date, or time of an individual event.
- If you chose Non-Consecutive Dates, click on the dates on the calendar you need for your event series. Then make any necessary adjustments to date, time, or event name for the individual events.
- Some events may be marked as a Conflict. You can choose to skip those conflicting dates, or leave them in the series. *Note: If you choose to skip any dates that are marked as a conflict, they will be deleted from the series.
- Check the box next to Allow unskipped conflicts if you would like to allow double booked dates to be included in this event series.
- Click Save.

- Do not publish the end date/time: Select this option to display the start date and time of the event, but not the end date and time. An end date and time are still required to publish the event, but you may want to hide that information if you are unsure of the event end time, such as with a sporting event.
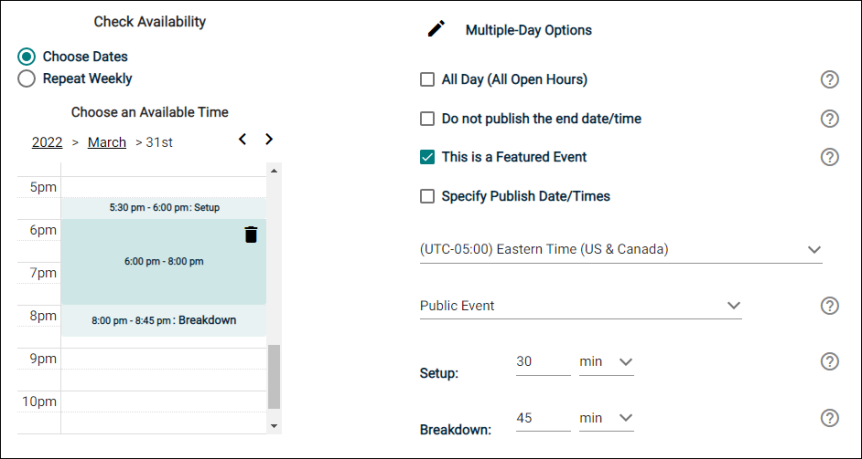
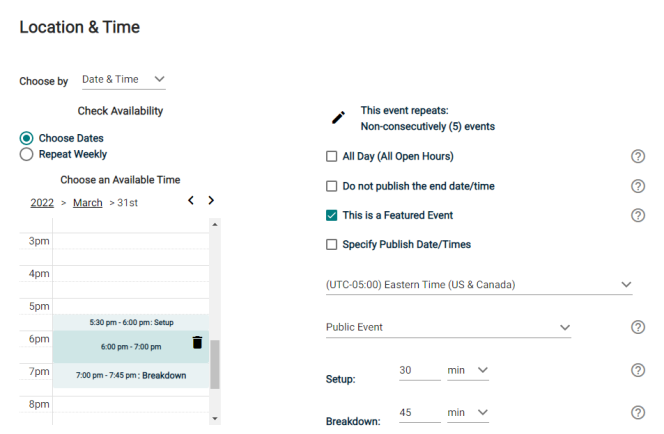
- This is a Featured Event: Choosing this option will prominently feature the event at the top of your calendar. Featured events must occur within the next 30 calendar days to be displayed, and must have an event image. By default, the next four featured events will be displayed on the calendar page.
- Specify Publish Date/Times: Determine when the calendar event should appear on the calendar and when it should be removed from the calendar.
- If the time zone for this event varies from the default time zone, select it from the drop down.
- Choose whether this is a Public Event, Private Event, or Unlisted Event.
- If applicable, enter the Setup and Breakdown time needed for your event. This prevents others from booking over the setup and breakdown time, while the event on the public calendar will only display the actual event start time.
- Select the desired Location from the drop down menu.
- Click Location Search in the Locations You've Selected panel.
- Search or filter the list and check the box next to each location needed for this event.
- Click Save.
- Click on the desired Location Setup for this event. The Capacity and Additional Fee (if any) for setup is displayed beneath each option.
- Enter any Location Setup Notes needed for each selected Location. *Note: If no room configurations are available for the selected Location, you will need to click the name of the location to expand this panel before entering any notes.
- Enter the number of attendees.
- Check the box next to any desired Location Features, such as Stage Lighting or a Podium. *Note: If a feature is grayed out, it is fixed to the location and cannot be removed.
- Click Add Note under a Feature to add details or instructions for the selected Feature.
- To add a location that isn't listed, click Add a Custom Location and enter the name of the location needed.
- Check the box next to All Day.
- Navigate to the appropriate month on the calendar.
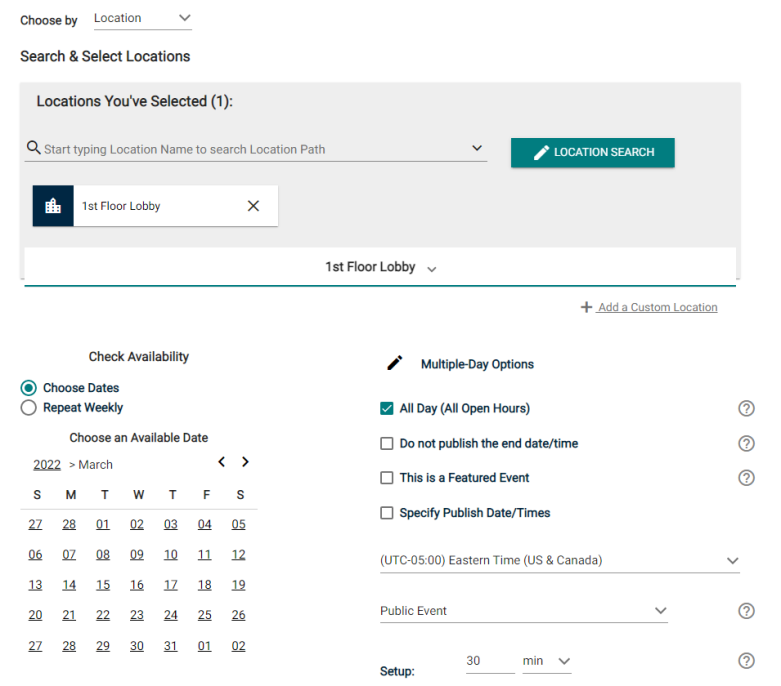
- Click on the start date needed for this event.
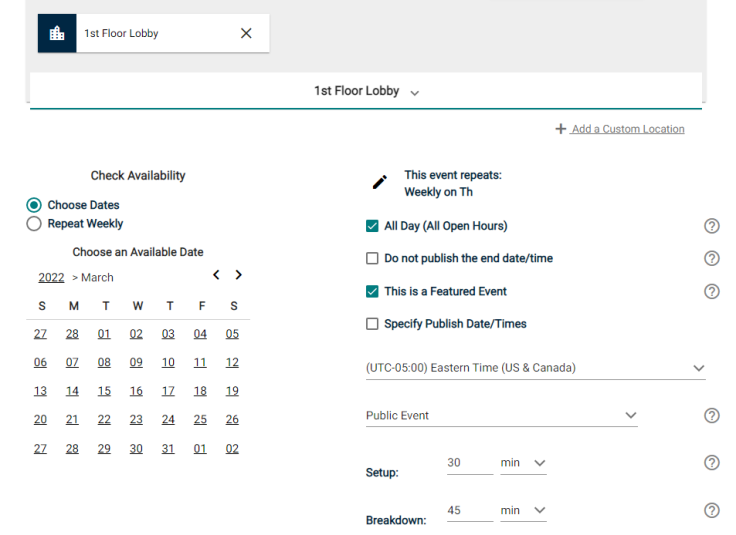
- If your event will repeat, click on the pencil icon next to Multiple-Day Options. *Note: This option will only appear after you have selected a start date on the calendar.
- Choose between Consecutive Dates and Non-Consecutive Dates.
- If you chose Consecutive Dates, choose how often the event repeats, and when the event series ends. After choosing the event pattern, the Events in this Series will populate. Any necessary adjustments can be made here before saving, including the event name or date of an individual event.
- If you chose Non-Consecutive Dates, click on the dates on the calendar you need for your event series. Then make any necessary adjustments the date or event name for the individual events.
- Some events may be marked as a Conflict. You can choose to skip those conflicting dates, or leave them in the series. *Note: If you choose to skip any dates that are marked as a conflict, they will be deleted from the series.
- Check the box next to Allow unskipped conflicts if you would like to allow double booked dates to be included in this event series.
- Click Save.

- Do not publish the end date/time: Select this option to display the start date and time of the event, but not the end date and time. An end date and time are still required to publish the event, but you may want to hide that information if you are unsure of the event end time, such as with a sporting event.
- This is a Featured Event: Choosing this option will prominently feature the event at the top of your calendar. Featured events must occur within the next 30 calendar days to be displayed, and must have an event image. By default, the next four featured events will be displayed on the calendar page.
- Specify Publish Date/Times: Determine when the calendar event should appear on the calendar and when it should be removed from the calendar.
- If the time zone for this event varies from the default time zone, select it from the drop down.
- Choose whether this is a Public Event, Private Event, or Unlisted Event.
- If applicable, enter the Setup and Breakdown time needed for your event. This prevents others from booking over the setup and breakdown time, while the event on the public calendar will only display the actual event start time.
- In the Choose By drop down menu, select Date & Time.
- Navigate to the start date needed for your event.
- Select the time you need by clicking on the appropriate start time on the calendar. Drag the time slot to be the appropriate length.
- If your event will repeat, click on the pencil icon next to Multiple-Day Options. *Note: This option will only appear after you have selected a time on the calendar.
- Choose between Consecutive Dates and Non-Consecutive Dates.
- If you chose Consecutive Dates, choose how often the event repeats, and when the event series ends. After choosing the event pattern, the Events in this Series will populate. Any necessary adjustments can be made here before saving, including the event name, date, or time of an individual event.
- If you chose Non-Consecutive Dates, click on the dates on the calendar you need for your event series. Then make any necessary adjustments to date, time, or event name for the individual events.
- Some events may be marked as a Conflict. You can choose to skip those conflicting dates, or leave them in the series. *Note: If you choose to skip any dates that are marked as a conflict, they will be deleted from the series.
- Check the box next to Allow unskipped conflicts if you would like to allow double booked dates to be included in this event series.
- Click Save.
- Do not publish the end date/time: Select this option to display the start date and time of the event, but not the end date and time. An end date and time are still required to publish the event, but you may want to hide that information if you are unsure of the event end time, such as with a sporting event.
- This is a Featured Event: Choosing this option will prominently feature the event at the top of your calendar. Featured events must occur within the next 30 calendar days to be displayed, and must have an event image. By default, the next four featured events will be displayed on the calendar page.
- Specify Publish Date/Times: Determine when the calendar event should appear on the calendar and when it should be removed from the calendar.
- If the time zone for this event varies from the default time zone, select it from the drop down.
- Choose whether this is a Public Event, Private Event, or Unlisted Event.
- If applicable, enter the Setup and Breakdown time needed for your event. This prevents others from booking over the setup and breakdown time, while the event on the public calendar will only display the actual event start time.
- Select the desired Location from the drop down menu.
- Alternatively, click Location Search in the Locations that you have selected on the panel.
- Search or filter the list and check the box next to each location needed for this event.
- Click Save.
- Click on the desired Location Setup for this event. The Capacity and Additional Fee (if any) for setup is displayed beneath each option.
- Enter any Location Setup Notes needed for each selected Location. *Note: If no room configurations are available for the selected Location, you will need to click the name of the location to expand this panel before entering any notes.
- Enter the number of attendees.
- Check the box next to any desired Location Features, such as Stage Lighting or a Podium. *Note: If a feature is grayed out, it is fixed to the location and cannot be removed.
- Click Add Note under a Feature to add details or instructions for the selected Feature.
- To add a location that isn't listed, click Add a Custom Location and enter the name of the location needed.
- In the Choose By drop down menu, select Date & Time.
- Check the box next to All Day.
- Navigate to the appropriate month on the calendar.
- Click on the start date needed for this event.
- If your event will repeat, click on the pencil icon next to Multiple-Day Options. *Note: This option will only appear after you have selected a start date on the calendar.
- Choose between Consecutive Dates and Non-Consecutive Dates.
- If you chose Consecutive Dates, choose how often the event repeats, and when the event series ends. After choosing the event pattern, the Events in this Series will populate. Any necessary adjustments can be made here before saving, including the event name or date of an individual event.
- If you chose Non-Consecutive Dates, click on the dates on the calendar you need for your event series. Then make any necessary adjustments the date or event name for the individual events.
- Some events may be marked as a Conflict. You can choose to skip those conflicting dates, or leave them in the series. *Note: If you choose to skip any dates that are marked as a conflict, they will be deleted from the series.
- Check the box next to Allow unskipped conflicts if you would like to allow double booked dates to be included in this event series.
- Click Save.

- Do not publish the end date/time: Select this option to display the start date and time of the event, but not the end date and time. An end date and time are still required to publish the event, but you may want to hide that information if you are unsure of the event end time, such as with a sporting event.
- This is a Featured Event: Choosing this option will prominently feature the event at the top of your calendar. Featured events must occur within the next 30 calendar days to be displayed, and must have an event image. By default, the next four featured events will be displayed on the calendar page.
- Specify Publish Date/Times: Determine when the calendar event should appear on the calendar and when it should be removed from the calendar.
- If the time zone for this event varies from the default time zone, select it from the drop down.
- Choose whether this is a Public Event, Private Event, or Unlisted Event.
- If applicable, enter the Setup and Breakdown time needed for your event. This prevents others from booking over the setup and breakdown time, while the event on the public calendar will only display the actual event start time.

- Select the desired Location from the drop down menu.
- Alternatively, click Location Search in the Locations that you have selected on the panel.
- Search or filter the list and check the box next to each location needed for this event.
- Click Save.
- Click on the desired Location Setup for this event. The Capacity and Additional Fee (if any) for setup is displayed beneath each option.
- Enter any Location Setup Notes needed for each selected Location. *Note: If no room configurations are available for the selected Location, you will need to click the name of the location to expand this panel before entering any notes.
- Enter the number of attendees.
- Check the box next to any desired Location Features, such as Stage Lighting or a Podium. *Note: If a feature is grayed out, it is fixed to the location and cannot be removed.
- Click Add Note under a Feature to add details or instructions for the selected Feature.
- To add a location that isn't listed, click Add a Custom Location and enter the name of the location needed.
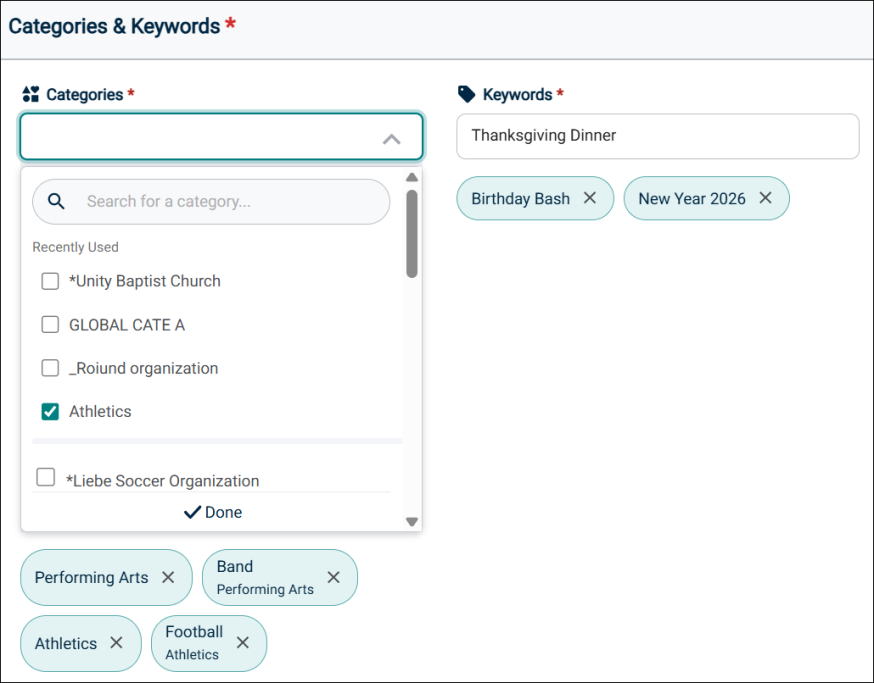
Categories and keywords allow you to classify your event to make them easier to find when visitors search your site.
- Choose any Category that applies to this event using the Categories dropdown list. Visitors will be able to search and filter events based on categories.
- Enter any Keyword or tag that visitors may use to search for your event in the Keywords text box and then press enter.
Important Points:
-
The Categories dropdown list includes global categories also.
-
The last 5 recently used categories and sub categories (if available) are shown on the Categories dropdown list.
-
The Search for a Category box is added to for searching categories and sub categories (if available). Enter a few characters to view matching search results.
-
Categories and sub categories are displayed in alphabetical order by default. However, this does not apply to the Search for a Category box and Recently used list.
-
Enter a keyword in the Keywords box and hit enter. It is added and displayed on the page.
-
When you select categories and sub categories, the count is dynamically displayed. It changes as you select or deselect them.
-
Selecting a parent category or sub category does not automatically select all the child sub categories. All of them have to be individually selected.
-
When the category and keyword names are very long, word wrapping gets enabled.
-
You can search for an event on the public calendar using the category or keyword that is added to the event. This is possible in all the views on the public calendar.
This is where any Custom Event Fields will show for this Site. This could include text fields, a check box field, or a multiple choice field. These additional information fields can be configured by an administrator on the Event Setup page. Required fields are marked with an asterisk (*) symbol.
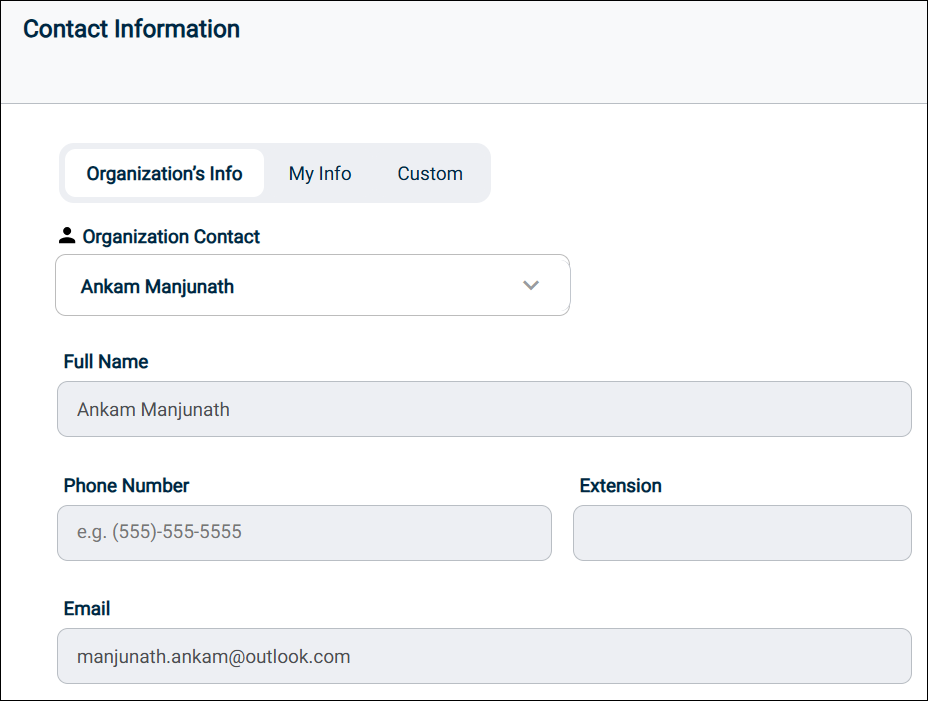
The Contact Information section has three tabs: Organization's Info, My Info, and Custom respectively. As a user or tenant administrator, you have the freedom to use a particular tab to specify contact information for the event depending on your business requirement.
The contact information is displayed on the public calendar and users with access to the public calendar can view the contact information. If the event or calendar is set to Public, anyone on the Internet can see the contact information for that event.
-
Organization's Info tab: This tab is displayed on the UI when either the logged in user is a member of an organization or is a tenant administrator.
When the tab is displayed, by default it is disabled. Under Event Details, when an organization is selected on the Organization dropdown list, the tab gets enabled.-
From the Organization Contact dropdown list, select the name of a member or leader for the organization selected above.
-
The details of the contact are automatically populated from the user's profile that exists on Event Manager. This is the contact person for the event whom users can reach out to if they have any questions or concerns.
-
All the fields on the Organization's Info tab are non-editable.
-
-
My Info tab: The My Info tab is the default tab that is displayed on the UI. When an organization is selected under Event Details, the Organization's Info tab is highlighted by default.
-
The My Info tab provides the name and contact details of the user who is currently logged into the site.
-
Anyone who is attending the event or planning to attend can contact them with questions related to the event.
-
All the information on the My Info tab is non-editable.
-
-
Custom tab: The custom tab is provided so that you can manually enter the contact details for an event coordination who can be contacted if anyone has a question or concern.
-
On the Custom tab, enter the complete name, phone number, extension, and email address.
-
The phone number must be of 10 digits and the extension must be of 4 digits. Only numbers are accepted. If you enter less than 10 or 4 digits for the phone number and extension, the system does not accept it.
-
In the email address field, only a single email address is accepted.
-
For phone number or email address, if you enter a value that is not acceptable, an error message is displayed on the page.
-
-
These changes are introduced to provide greater flexibility to event requestors and admins and make it easy for them to quickly submit an event request.
-
As a tenant administrator, you can create a new event request form or edit an existing form. On the Contact Information section, you can do the following:
-
Click the edit icon next to Contact Information to modify the section heading.
-
In the Description field, you can enter a description for the section and use the newly introduced editing options. After making the changes, click Save.
-
The changes made above will reflect in the Contact Details section of the event request form when it is used by a requestor for submitting an event.
-
You can upload a maximum of 10 files (images or documents). The maximum size of an image or document can be 10 MB. If either of these conditions is violated, an error message is displayed.
There are several different places the Event Image is displayed:
-
The Highlighted Events area
-
The Event Summary view
-
The Event Details view
-
The Location view
Each image should have an aspect ratio of 1.6: 1 in order to scale properly in all views. For example, an image that is 1600 x 1000 pixels will scale properly throughout Event Publisher.
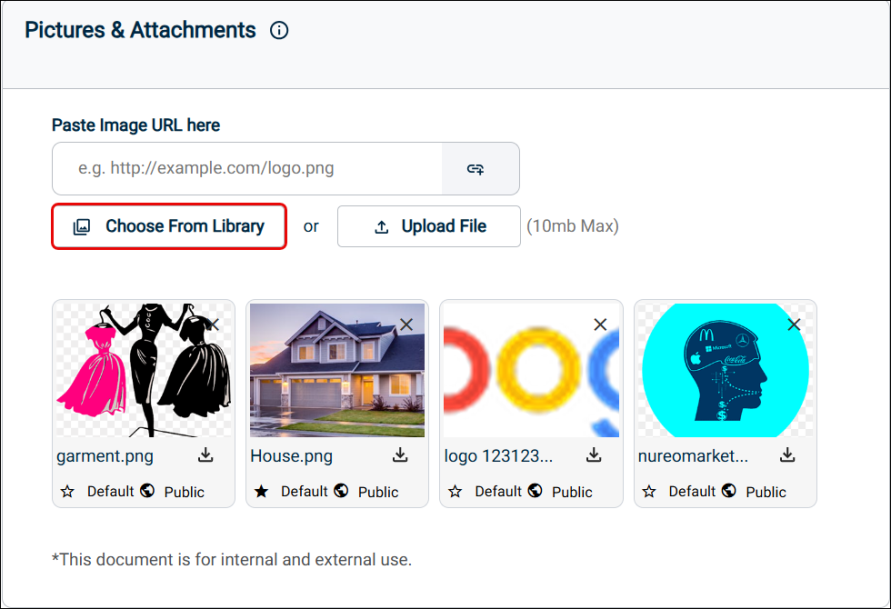
- In the Paste Image URL here box, enter the URL for importing an image from an external source and click the button on the right. When you click this box, you will notice that the borders are highlighted in teal color.
- Click the Choose From Library button and select an image or document from the media library.
- Click the Upload File button to attach an image or document from your local computer.
- Default selection: You can click the Default icon on an uploaded image file (not documents) so that the image appears on the public calendar. At a time only one image can be used as the default image.
- Public / Private toggle: Click the icon to make an image or document as Public or Private. The Default image for an event is always set as Public. Attachments that are marked as public are displayed on the public calendar.
- When you click the Choose From Library button, the Choose From Media Library popup is displayed. The following changes are made to enhance your experience:
- The popup has folders containing images and documents that can be attached to an event request form. A search bar is provided where you can enter a keyword to search an image across the folders. The search shows results even when few characters match the file name.
- When you click a folder, you will notice that files (documents and images) are shown as thumbnails. Image files have an image preview and document thumbnails have a document logo.
- On the top, the name of the containing folder is displayed.
- When you select a thumbnail, a tick icon appears and when you deselect it, it disappears. Accordingly, the count of selected images is dynamically updated near the bottom of the popup.
- You can select a maximum of 10 files within or across folders on the Media Library.
- When you hover the mouse on a thumbnail, the complete file name and extension is displayed on the page.
- Pagination is provided near the top of the page. You can either click the arrows to move back and forward between pages or select a page number from the dropdown list.
- On a single page, a maximum of 20 thumbnails are displayed and they are arranged in alphabetical order.
- Select at least one thumbnail and click the Attach button to include the file in the Pictures and attachments section of your event request form.

NOTE The search functionality is also available from inside the containing folders.
NOTE When you attach a file, it appears in the form of a thumbnail on the page with multiple icons. You can click the appropriate icon to remove or download the image.
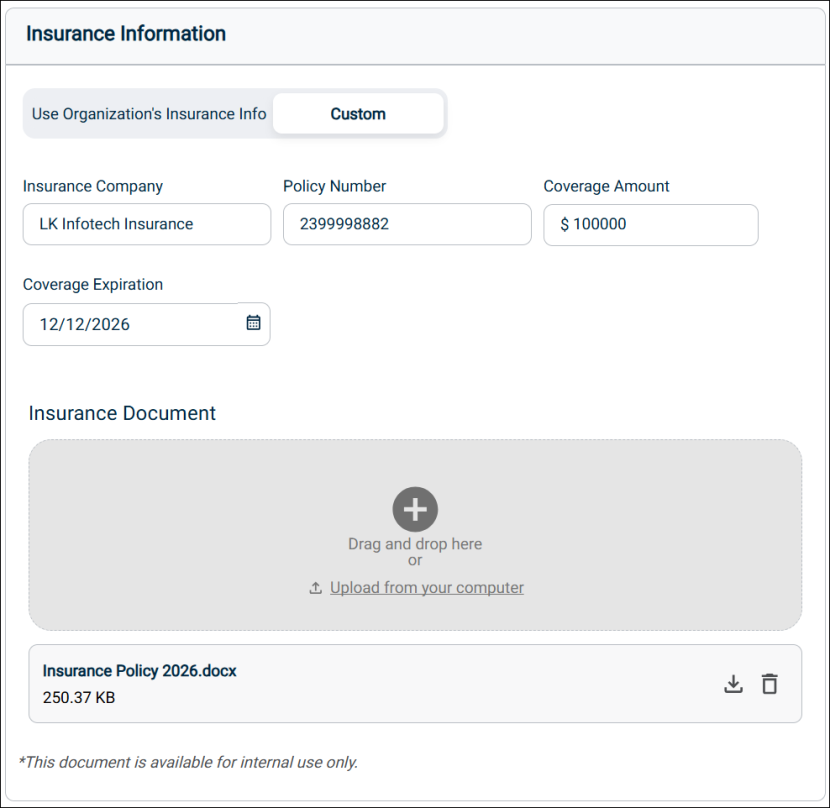
You can add insurance for the event. This section is enhanced and the UI is improved so that you can quickly submit an event. It is divided under two tabs: Use Organization's Insurance Info and Custom.
By default, the Custom tab is first display to the user. All the fields are blank and you can enter and edit data. The Use Organization Insurance Info tab is activated and displayed first to the user after an Organization is selected in the Event Details section from the Organization dropdown list. Fields on this tab are non-editable.
-
You can select the Use Organization's Insurance Info tab to automatically populate all the fields with values from the organization selected above. This data is pulled by Event Manager from Settings > Organizations > Edit an Organization > Insurance. If any insurance document is there, that is all pulled and populated in the Insurance Document section. A link to download the document is also provided.
-
Alternatively, select the Custom tab to edit the organizational data or enter your own values in all the fields. After selecting the Use Organization's Insurance Info tab, if you switch to Custom tab, all the values are copied into the fields under the Custom tab. You can edit the values under the Custom tab.
NOTE The insurance document is not copied to the Custom tab.
-
On the Custom tab, the Insurance Document section enables you to provide an insurance document (or an image). You can either drag and drop the document in the space provided or upload it from your computer by clicking the link.
NOTE The uploaded file shows the file name, file type, and size of the document. Only one document can be uploaded with a maximum size of 10 MB and multiple file types are supported.
NOTE Event Manager stores the uploaded documents under Dashboard > Settings > Insurance Documents.
Important Points
-
In the Coverage Expiration field, if you enter today's date or a date that has elapsed, then an error message is displayed on the page.
-
On the Custom tab, when you click anywhere on a text box where a value can be entered, the borders are highlighted in teal.
-
If you do not enter a value in the required text boxes (with an asterisk) and move away or the validation fails, then the borders are highlighted in red.
-
In the Insurance Document section, click the respective icons to download or delete the document.
-
Use the Drag and Remove options to change the placement of the section or remove it altogether.
A Sale Item can be a physical item being sold for the event, such as a T-shirt, or a registration item, such as an admission ticket.
- Click the Add a Sale Item button.
Details
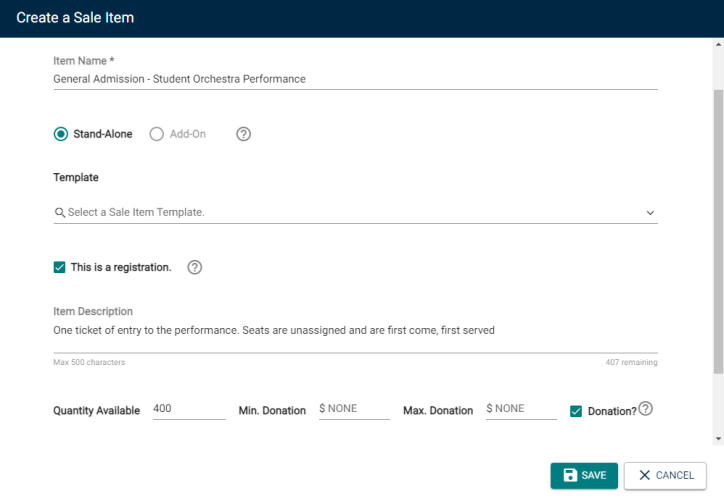
- Enter an Item Name.
- If this item is an Add-On, select that option.
- An Add-On item can only be purchased if a separate item is also being purchased. Choose the sale item this Add-On is dependent on. *Note: You must add the Stand-Alone item prior to adding the Add-On item.
- If you would like to use a sale item template, select it from the drop down menu. This will populate any field that is included in the template.
- If you would like this sale item to include ticketing so attendance can be tracked, check the box next to This is a registration. The tickets will be emailed to the user, and will include a QR code so the ticket can be scanned.
- Enter an Item Description. This should provide more detail than the Item Name.
- Enter the Quantity Available for this item.
- If there is a Cost associated with this item, enter the amount. If you would prefer to accept donations, check the Donation box.
- Enter any applicable minimum and/or maximum donation amount.
When accepting donations as payment for a sale item, a minimum donation amount may help ensure that event costs are covered, and a maximum donation amount may help avoid donation limits for a non-profit organization and reduce the risk of accidentally large donations.
- By default, the sale item will be Available as long as the event is published. If you would prefer, select Specific Availability to determine a time period prior to the start of the event that you would like this item to be available.
- If that is all the information you would like to enter for this sale item, click the Save button. Otherwise, move on to the next section.
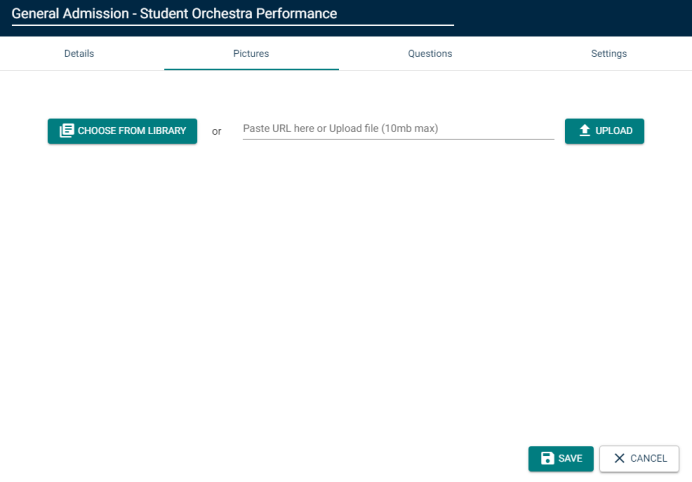
Pictures
- Click on the Pictures tab.
- Upload a picture by locating the file on your computer, or pasting the image URL in the text field.
- Click Choose From Library to find an image that has been added to the Event Publisher media library.
- If that is all the information you would like to enter for this sale item, click the Save button. Otherwise, move on to the next section.
Questions
- Click on the Questions tab.
- If the sale item is a Registration, then First Name, Last Name and Email Address will be required questions by default.
- Check the Include box next to any other questions you would like the user to answer from the list of Available Questions.
- Click the Add a Question button to create a question that is not yet in the list.
- Select the question type from the drop down menu, then type the Question text. *Note: Only questions that have been added this way are able to be edited.
- If that is all the information you would like to enter for this sale item, click the Save button. Otherwise, move on to the next section.

There are two ways to add a question to the list of Available Questions for a Sale Item.
- Adding a question directly from this page will make that question available for any sale item attached to this event. Use this option if you do not need the question to be available for other events.
- Adding a question to the question library in Sale Item Settings will make that question available for all sale items across all events moving forward. If you want to use this question again for a later event, use this option.
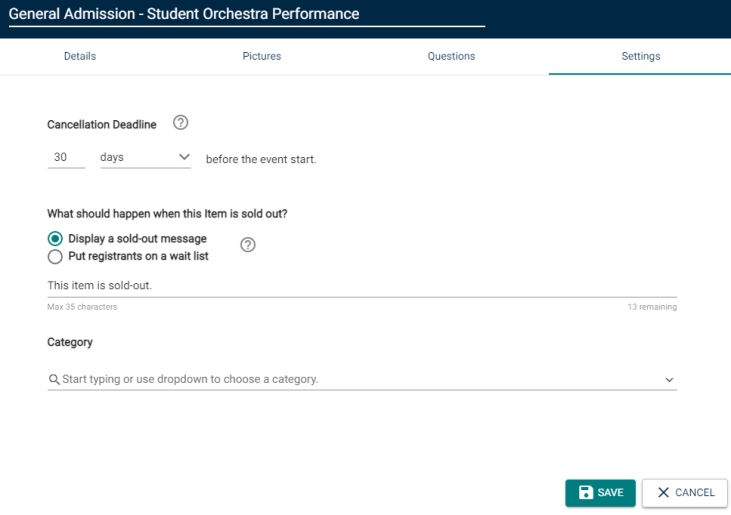
Settings
- Click on the Settings tab.
-
Enter the amount of time prior to the start of the event that will serve as the Cancellation Deadline. By default, this will be 24 hours prior to the start of the event, but can be set up with units of minutes, hours, days, or weeks.
- By default, when an item is sold out, the system will Display a sold-out message. Enter your desired sold-out message in the text field.
- If you would prefer, you can choose to Put registrants on a waitlist. Choosing this option means that there will be no Sold-Out message, but instead a user will be able to add themselves to the waitlist. This list can be managed from the event’s registration Dashboard, where an administrator can process a wait-listed user’s registration manually if a spot becomes available.
- Enter a Category for this sale item. These Categories can be set up in Sale Item Settings.
- Once you have entered all necessary information for this Sale Item, click Save.
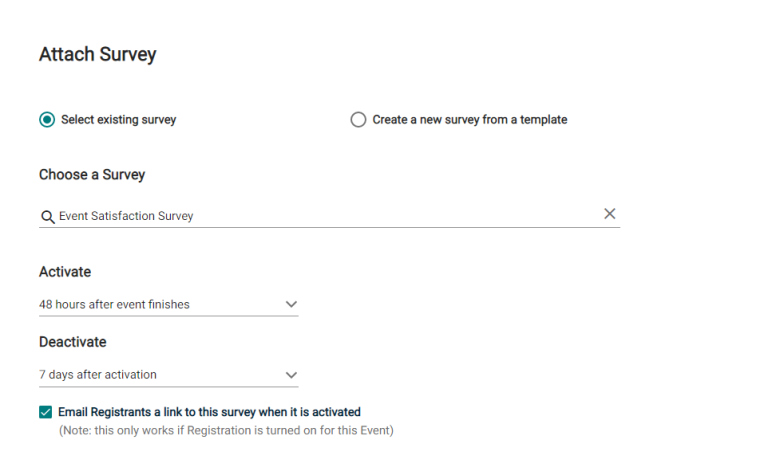
You have two options when attaching a survey to an event: selecting a survey that has already been created, or creating a new survey from a template.
Select existing survey
- To attach an existing survey, be sure the Select existing survey option is selected.
- Use the Choose a Survey drop down menu to locate the survey from the list.
-
Choose the time frame after the event that the survey will Activate and Deactivate. *Note: Active surveys can be answered by anyone with access to the survey link.
-
If this event included registration, check the box to Email Registrants a link to this survey when it is activated.
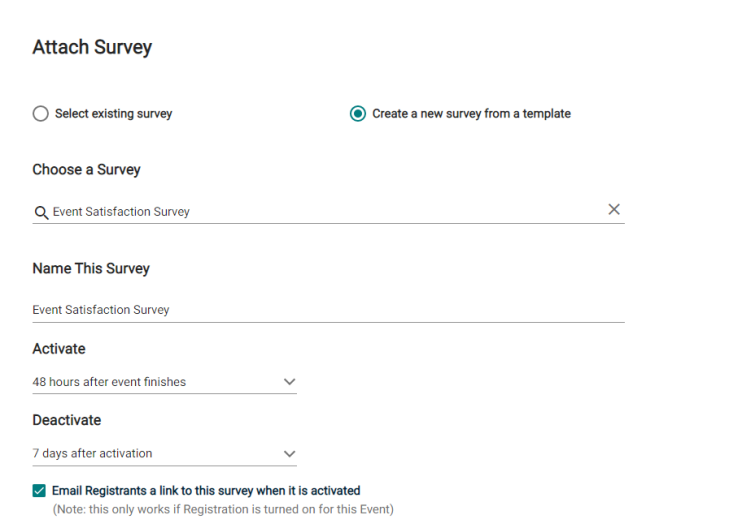
Create a New Survey From a Template
- To create a new survey, select the Create a new survey from a template option.
- Use the Choose a Survey Template drop down menu to locate the template you wish to use.
- Type a name for the survey.
-
Choose the time frame after the event that the survey will Activate and Deactivate. *Note: Active surveys can be answered by anyone with access to the survey link.
-
If this event included registration, check the box to Email Registrants a link to this survey when it is activated.
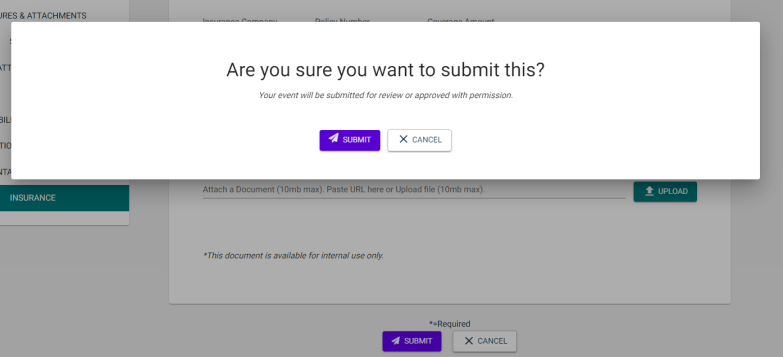
Submitting the Event
- When you have finished entering all necessary information on the event form, click the Submit button at the bottom of the form.
- In the pop up window, click Save.