Entering labor hours and material purchases in Incident allows you to track the cost of a incident. These transactions open up reporting doors to help you see where resources have been allocated.
How to Enter Purchase Transactions
- On the incident form, scroll down to the Transactions sections and click on New Purchase Transaction.*Note: The incident form must be saved first before you can view the Transaction section.
![]()
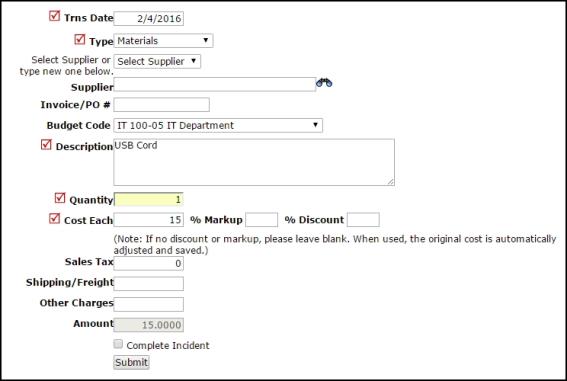
- Trns Date will automatically populate with today's date. This date can be backdated to reflect the date of the actual purchase.
- Identify the Type of purchase transaction from the drop down list. (Materials, Rentals, Contract Services, Material Return, or Discount)
- Choose the Supplier from the drop down list/binocular lookup. If the Supplier is not in the list, create a new one by typing the Supplier name in the field. *Note: Once the transaction is saved, the new Supplier will be added to the list.
- Enter the Invoice/PO#.
- Select the Budget Code associated with this transaction.
- Enter a Description of the purchase. (Materials: What was purchased? Rentals: What was rented? Contracted Services: What services were contracted out? Etc.)
- Identify the Quantity purchased.
- In the Cost Each field, enter the cost per unit and enter any Markups or Discounts. *Note: If the quantity is 1, the Cost Each entered will be the total cost.
- Add any additional Sales Tax, Shipping/Freight, or Other Charges.
- The Amount will automatically calculate based on the Quantity, Cost Each (Markup/Discount), Sales Tax, Shipping/Freight, and Other Charges.
- If the incident has been completed, you can change the status to Complete by checking the Complete Incident box.
- Click the Submit button to save.
Editing and Deleting Purchase Transactions
- To edit or delete a Purchase Transaction, click on the item description in the Description field from the Transactions section of the incident.
![]()
- The purchase entry page will load so you can edit the information. Click the Submit button to save the changes.
- To delete the transaction, click the Delete button at the bottom of the entry page.
