New Dashboard
The new Dashboard update introduces enhanced Work Overview, Work Center, Purchase & Inventory, and Global Settings Widgets to improve user efficiency and accessibility.
-
The Work Overview Widget provides a quick snapshot of key work orders, categorized for easy tracking and navigation.
-
The Work Center Widget streamlines work order management by displaying assigned work orders in a card format with quick edit options.
-
The Purchase & Inventory Widget helps users monitor purchase orders and inventory, ensuring timely reordering and approvals.
-
The new Global Settings allow users to customize their Dashboard Widgets.
-
The dashboard also supports drag-and-drop functionality, similar to the previous version, allowing users to easily move and rearrange Widgets.
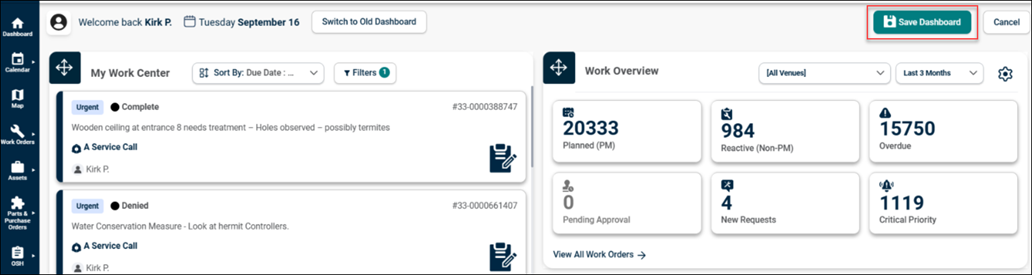
Access Dashboard
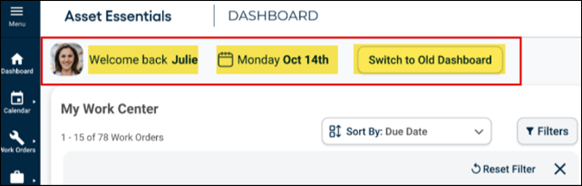
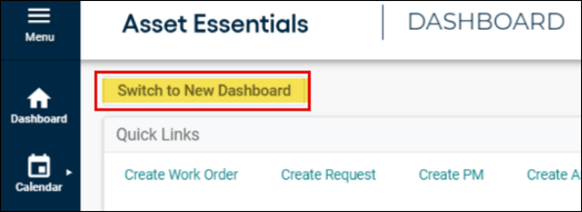
The toolbar offers easy navigation from old to new AE Dashboard and profile information.
-
Log into Asset Essentials.
-
Navigate to the Dashboard (ignore this step if Dashboard is the default landing page).
-
Dashboard Toggle: Switch between the old and new Dashboards by clicking Switch to New Dashboard or Switch to Old Dashboard.
-
If the user accessed the new/old Dashboard and logged out, post login the user preference of the Dashboard will persist.
-
Profile & Date: View the profile image, username, and the current date. (Non-clickable and this toolbar are only visible in new Dashboard.
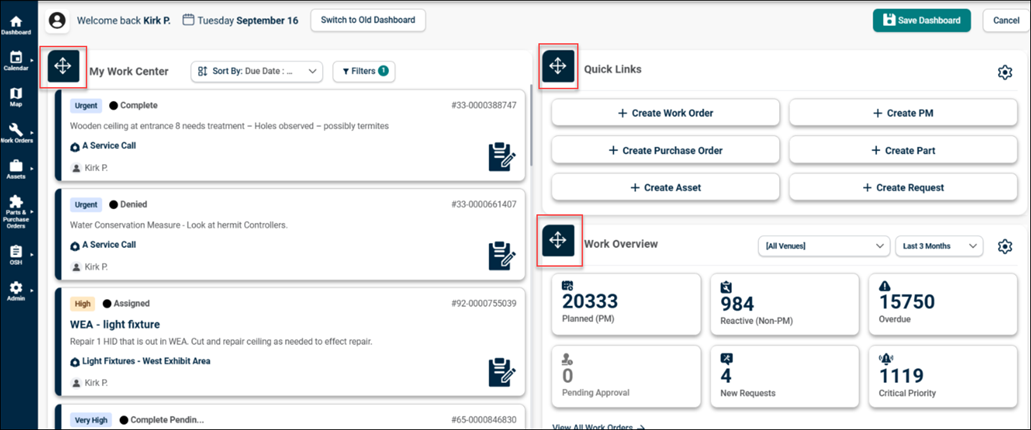
Work Overview Widget
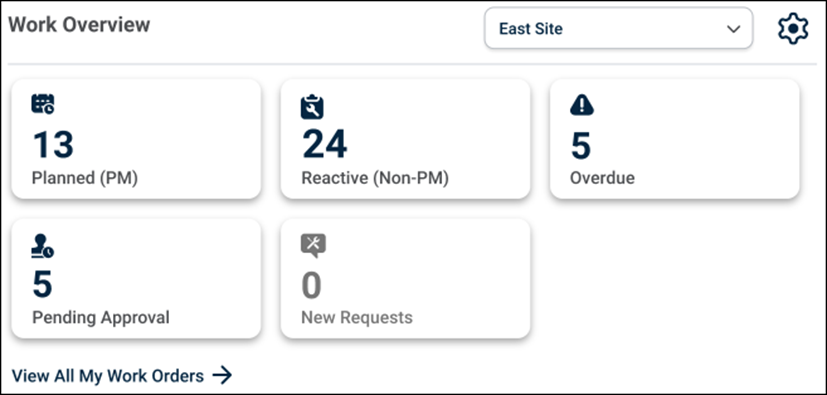
The Work Overview Widget is a new Dashboard feature that provides users with a quick summary of important Work Order categories. This Widget displays the total count of key work order types in a card format, eliminating the need to navigate to the Work Order List section for a quick status check.
Users can click on any card to navigate directly to the Work Order List page, where filters are pre-applied to match the count shown in the Widget. The view all links will enable users to access all the work orders with respect to the filter applied.
-
Planned (PM): These are scheduled work orders for future completion. The card shows the number of planned tasks awaiting execution.
-
Reactive (Non-PM): These work orders are generated in response to unplanned events that require immediate attention. The card shows the number of non PM work orders that have been initiated based on unexpected occurrences.
-
Overdue: This card category shows work orders that have missed their due date, helping users quickly identify tasks that need urgent attention.
-
Pending Approval: The count inside this card will show work orders which are awaiting approval before they can proceed.
-
New Requests: Newly created work orders that are waiting for processing or assignment. This category helps users spot fresh requests easily.
-
Critical Priority: These are high-priority work orders (Priority weightage minimum) that require immediate attention. Users can instantly identify and address tasks that have been flagged as urgent.

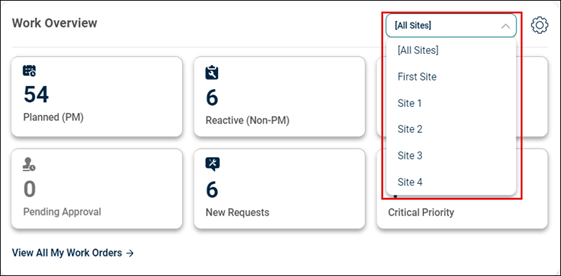
Site Selection
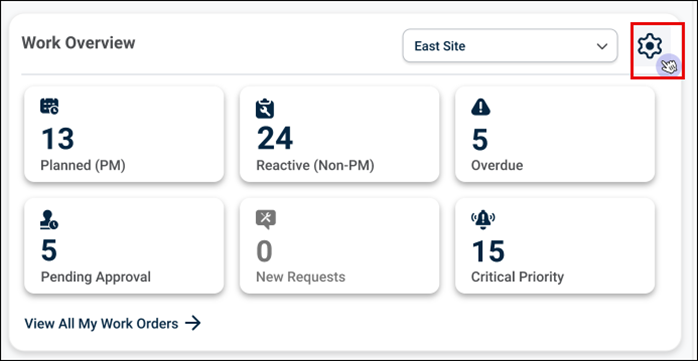
The Work Overview section now includes a site selection filter, helping to view only the work orders relevant to the chosen site.
-
Use the Site selection drop-down menu to select All Sites or Individual Site option.
-
Verify that the work orders displayed in the Widget correspond only to the selected site.
-
If All Sites is selected, work orders from all sites should be visible.
-
If an individual site is selected, only work orders tied to that site should be shown.
-
Date Selection
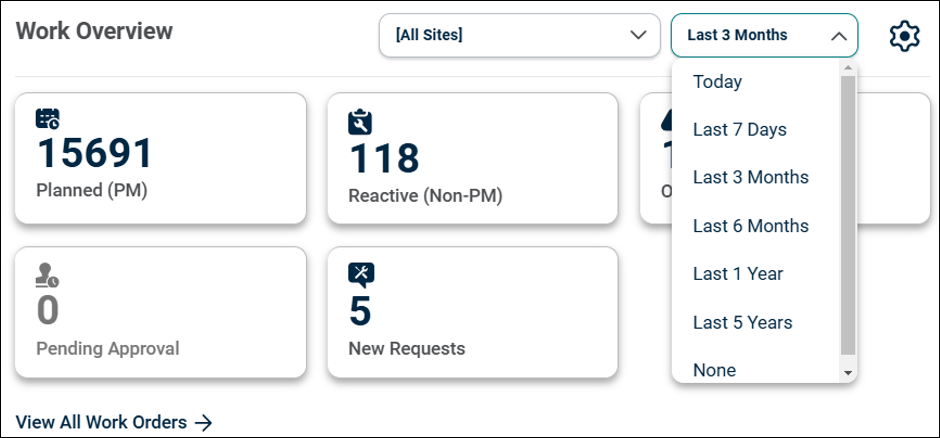
The Work Overview section includes a date selection filter, allowing users to view work orders relevant to a selected date range.
-
Use the Date selection drop-down menu to select the date range option. Users can choose a predefined date range to filter the work orders displayed.
-
By default, Last 3 Months date range will be selected. Users can modify this as per their needs.
-
Based on the selected date range, the work orders on each card will update accordingly. *Note: The None option denotes that all the applied date filters will get removed and the user can access all the work orders.
Card Customization Functionality
The Work Overview Widget includes Customization Functionality, allowing users to choose which work order cards they want to display.
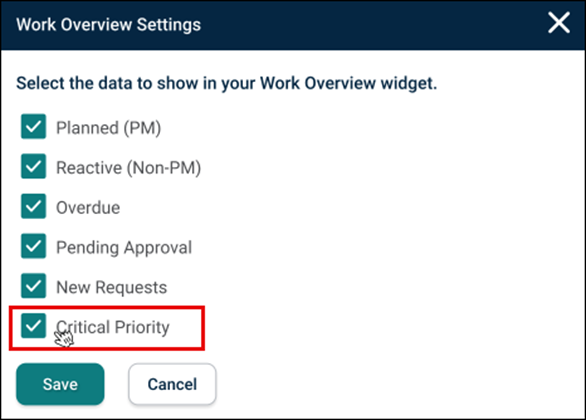
Click on the settings icon within the Work Overview section to open the customization menu.
The Work Overview Settings screen appears. Check in/off work order categories to display or hide specific cards.
Click Save.
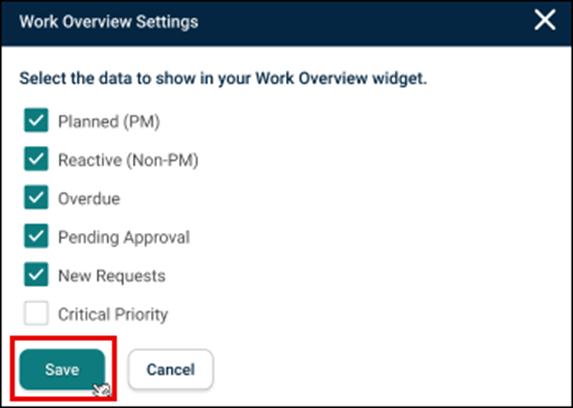
Example: The Critical Priority card will be hidden from the Work Overview section.
My Work Center Widget
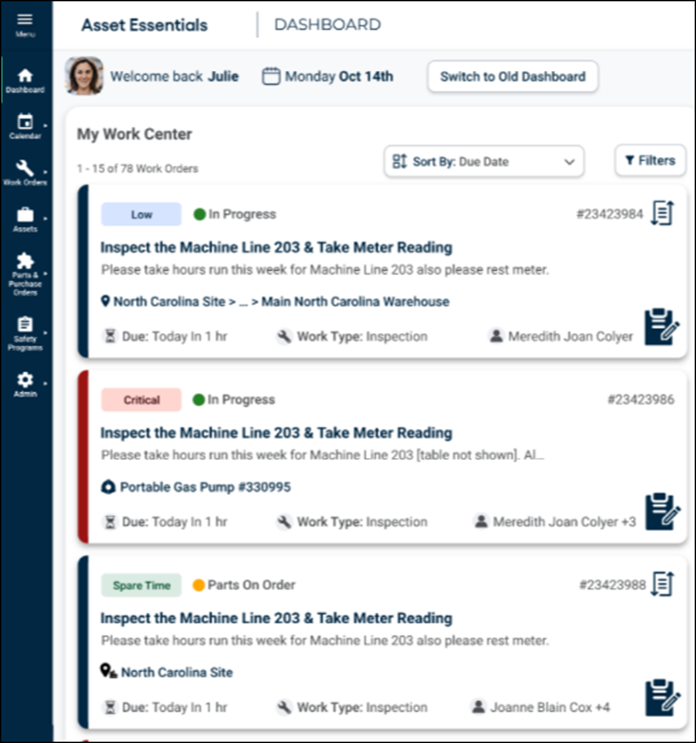
The Work Center Widget provides users with quick access to their assigned work orders, displaying all essential details in an easy-to-read card format. This enhancement improves efficiency by reducing the need for vertical and horizontal scrolling in the current work order list page.
Work Order Cards: Each field and card show essential details, such as:
-
Status: Shows the status of the work order, with a dot color that is configurable to suit user preferences.
-
Priority: Displays the priority level of the work order, with color coding for quick visual reference.
-
Work Order Number: Unique identifier for the work order. Users can click on the work order number to navigate to the Long Work Order form.
-
PM Icon: Indicates if the work order is preventive maintenance (PM) related, shown next to the work order number.
![]()
-
Title: The name or title of the work order.
-
Work Requested: This describes the specific work requested.
-
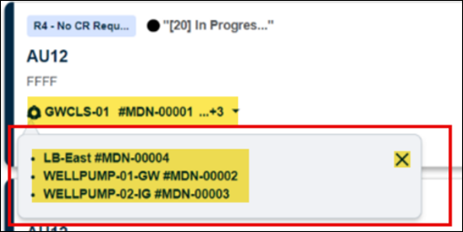
Work Source: Indicates the work source type, showing any of the three available types (site, location and assets).
-
Due Date: Shows the due date for completion of the work order.
-
Work Type: Displays the work type associated with the order.
-
Quick Edit Icon: Allows for easy access to a quick edit overlay for fast adjustments.
Work Source Pop-Up: If there is more than one work source, click on the work source to see all the origin (Asset, Site, or Location). A tool tip will appear, displaying all available work sources.
Click on the cross icon to close the drop-down menu.
Load More Button: Go to end of the Work Center container. Click Load More Work Orders to view additional 15 work order cards if available.
Quick Edit Overlay
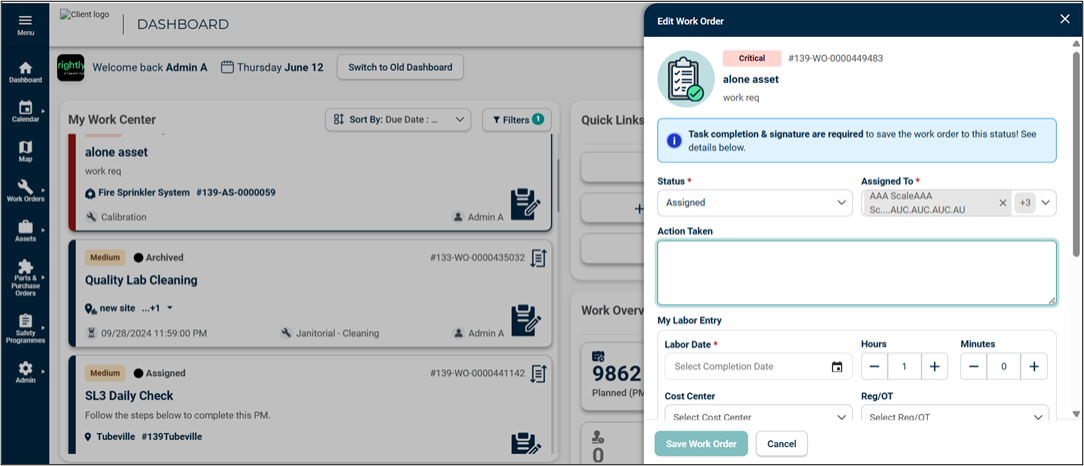
The Quick Edit overlay allows to make quick updates to a work order directly from the Work Center Widget.
-
Click on the Quick Edit icon at the bottom right of the work order card. The overlay will appear on your screen.
-
Status: Select the desired status from the drop-down menu. Default would be current Status of the work order.
-
Assigned To: Select assignees from the drop-down menu. The drop-down menu will contain both assigned users of the work order along with the unassigned users.
-
Action Taken: Type the action you performed for the work order.
-
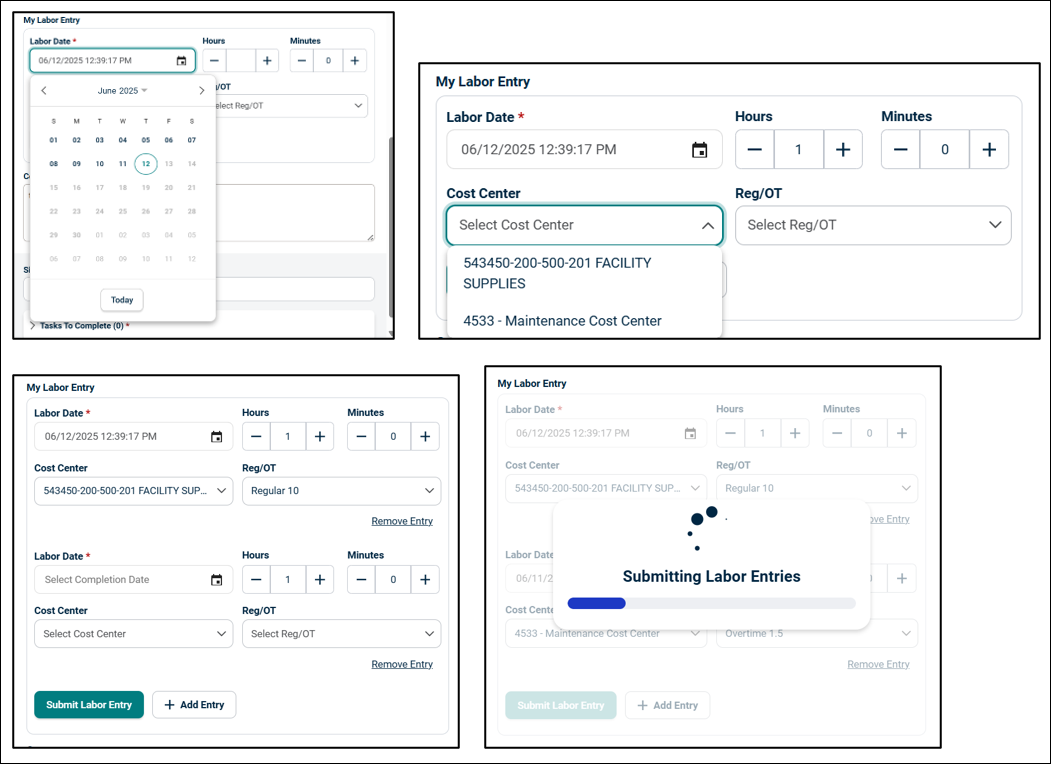
Labor entry:Select the end date inside the Labor Date, click on the +/- icon or type the number of hours worked on, select the cost centre, and Reg/OT from the drop-down menu.
-
Click + Add Entry button to add another labour entry with the above-mentioned field.
-
Click Remove Entry link to remove the labour hour entry.
-
Click Submit Labor Entry button to save all the entries added. The list will get refreshed; all the labour entries will get saved and can be accessible in the labour section entry table in Long Work Order form. *Note: User cannot put negative hours and zero in both hour and minute section. User cannot edit the labour entries from quick edit overlay.
-
-
Comment: Type your comment related to the work order. The Save Work Order button will be activated. Click on it to save the work order.
-
Click Cancel button to close the overlay without saving.
-
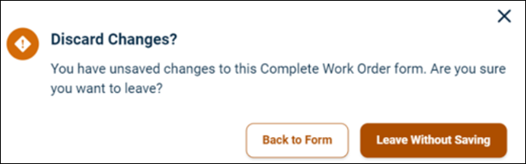
If no fields are filled or updated, click Cancel button or X icon. Otherwise, an error message appears. Choose either to save or discard the changes.
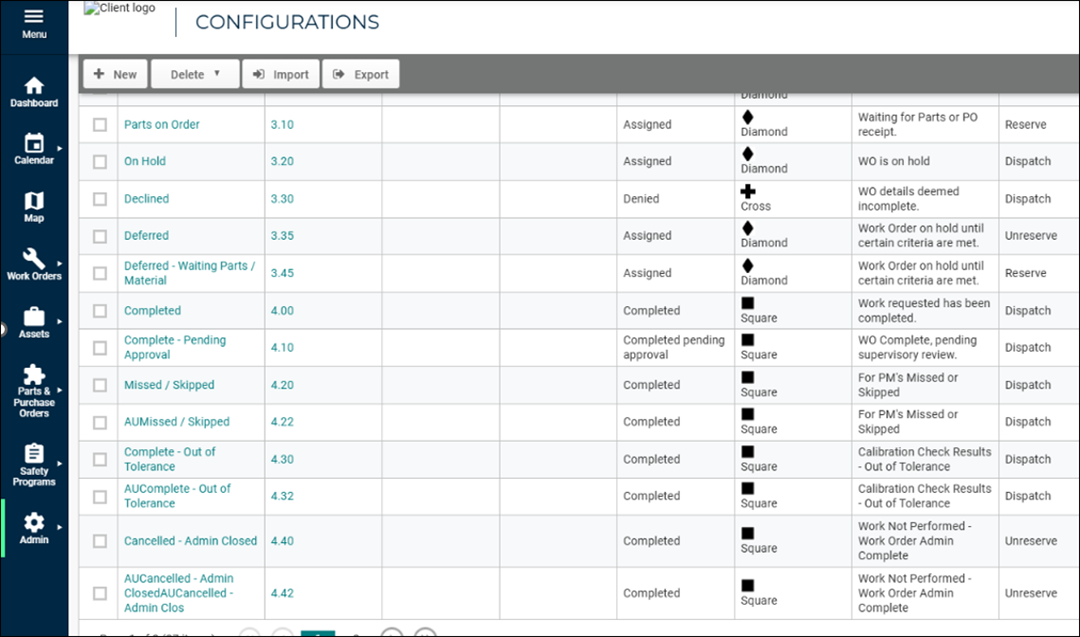
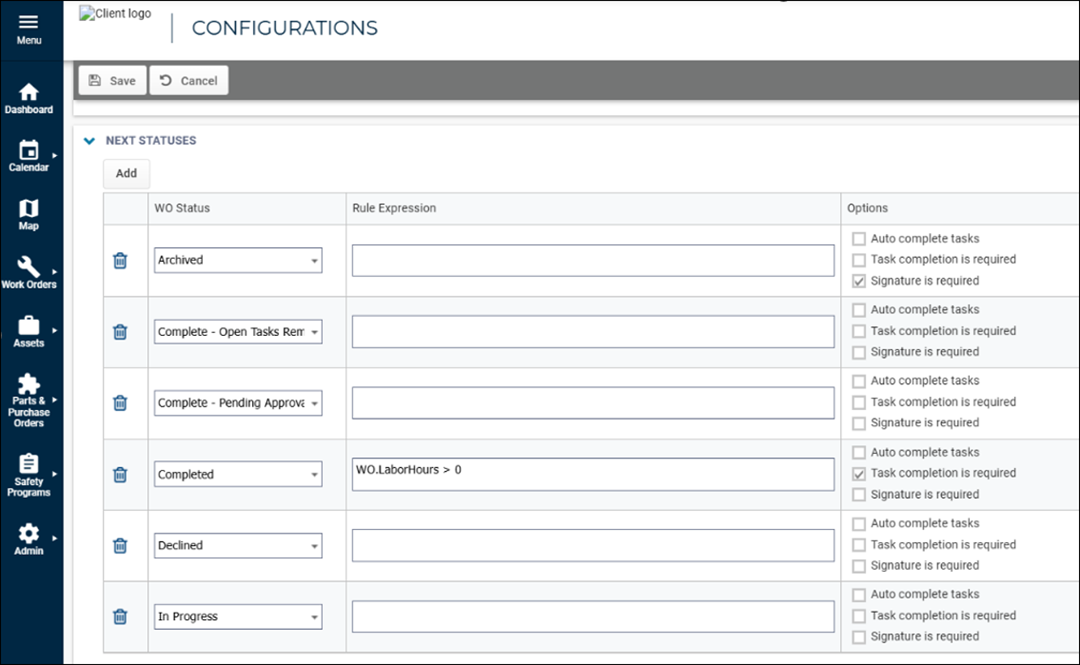
Next Status Update – Signature, Task, and Auto Task Completion
Users can configure the Next Status in the Work Order Status Settings by enabling checkboxes for Signature, Task, and Auto Task Completion as mandatory fields to proceed to the next status.
-
When a user selects a next status in the Quick Edit Overlay, the required fields appear. This ensures compliance with mandatory completion requirements before progressing to the next status.
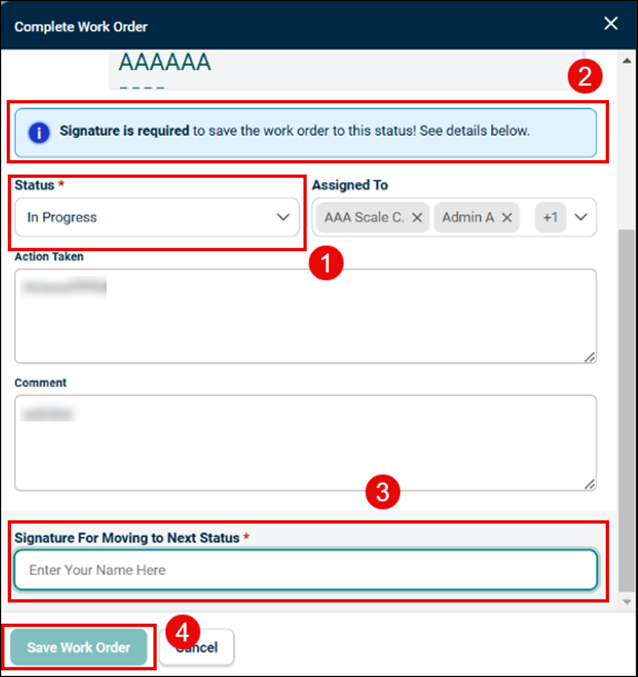
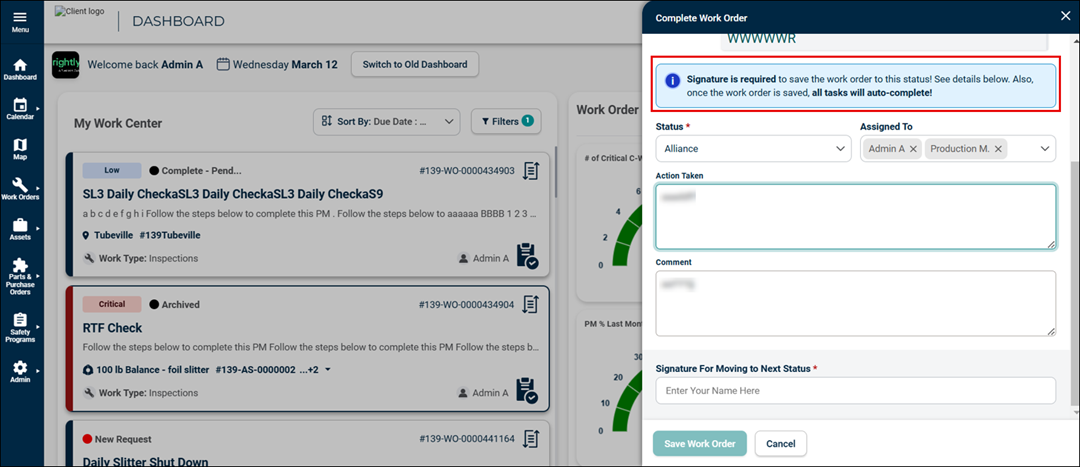
Signature Required to Move to Next Status
Users are required to enter signatures to move to the next status and save a work order in the Quick Edit Overlay.
-
Select the desired next status from the Status drop-down menu. An alert message appears to notify the user that a signature is required to proceed to the next status. The Signature For Moving to Next Status will be marked as mandatory in the Work Order status configuration, the system will enforce it before allowing the status update.
-
Enter the signature in the Signature For Moving to Next Status field. The Save Work Order button becomes enabled.
-
If all the required fields are completed, click Save Work Order button.
Only Marking all Tasks as Done is Required
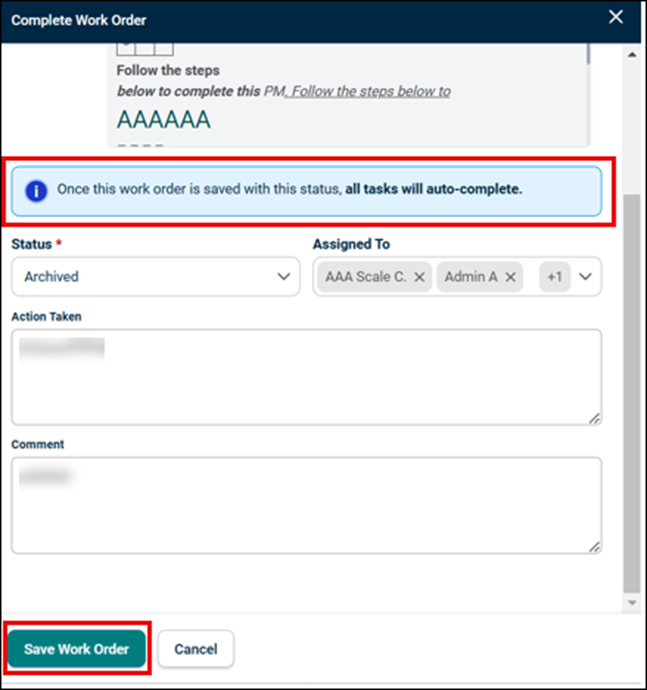
Users will now be required to mark all tasks as done to move to the next status and save a work order in the Quick Edit Overlay.
-
Select the desired next status from the Status drop-down menu. An alert message appears to notify the user that completing the tasks are necessary to proceed to the next status.
-
The Tasks to Complete field will become available and marked as mandatory in the Work Order status configuration, the system ensures that all tasks must be completed before proceeding.
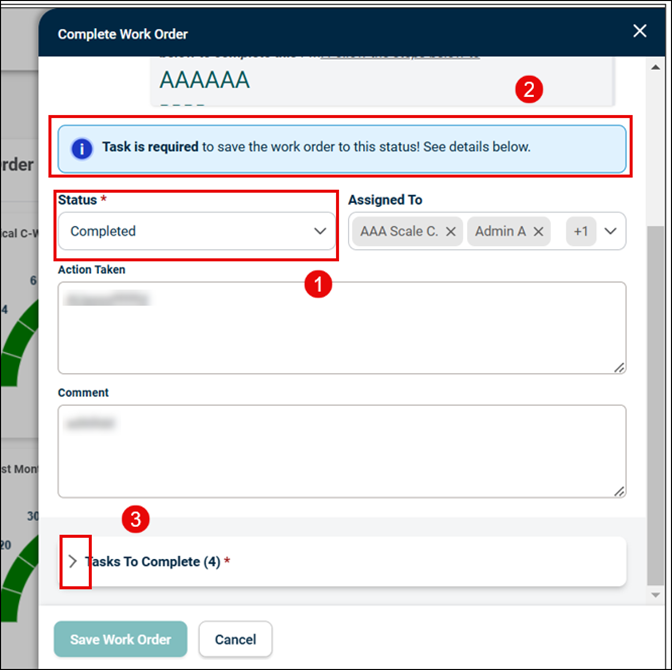
-
The task accordion is initially collapsed, displaying the number of pending tasks required to be completed before progressing.
-
Click on the right arrow key to view and interact with all tasks.
-
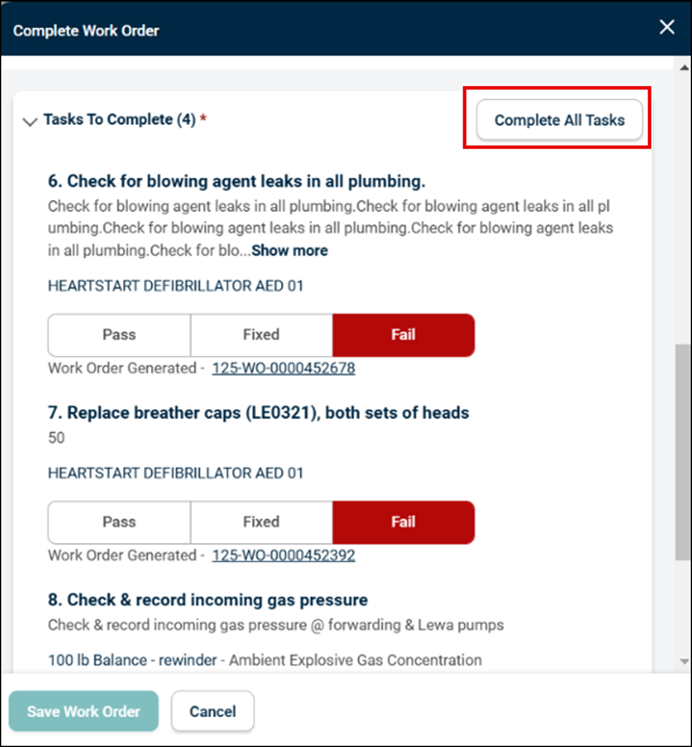
Click Complete All Tasks to automatically complete and save pending tasks.
-
Once saved, these tasks are:
-
Checked in the long Work Order Form.
-
The tasks will get removed from the task list inside the task section in Quick Edit Overlay.
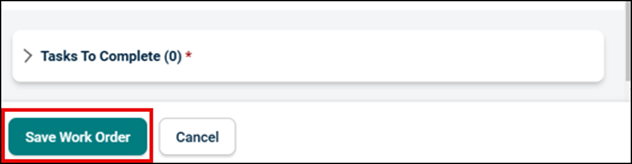
-

Once all tasks are completed, the Save Work Order button becomes enabled. Click Save Work Order button. The task counter updates, displaying Tasks to complete (0), confirming that all tasks are done.
Signature and Tasks are Required
-
Signature Requirement: Users must complete Signature Required to Move to Next Status to mark their signature inside the Quick Edit Overlay.
-
Task Completion: Users must complete Only Marking all Tasks as Done is Required to mark all tasks as complete.
-
After completing both the steps the next status will be accessible and the Save button be enabled for final submission.
Only Auto Complete Tasks are Required
-
When a user selects the next status that mandates auto-complete tasks, a confirmation message will appear.
-
The message will inform the user that saving the work order will automatically complete all pending tasks associated with it.
-
The Save Work Order button will always remain enabled, allowing users to proceed with the update.
Signature and Auto Complete Tasks are Required
When a user clicks on the next status where both auto-complete tasks and signature are required, a message will pop up. Follow Signature Required to Move to Next Status to complete the signature and save the work order before proceeding.
My Work Center Filter
Access Filter in My Work Center Widget
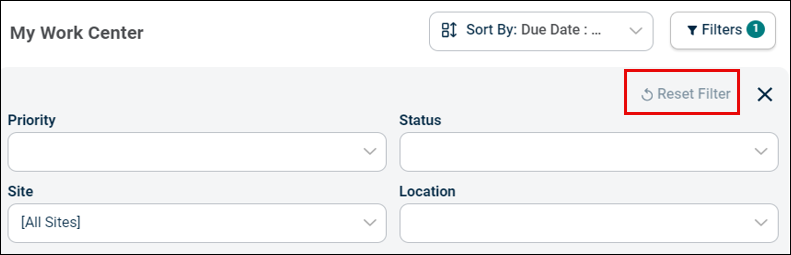
The filter offers easy filtering of the work order inside the Work Centre Widget.
-
Click Filter button to access the Filter drop-down menu.
-
Access four filters:
-
Status Filter: Allows users to filter work orders based on their status.
-
Priority Filter: Enables filtering work orders by priority levels.
-
Site Filter: Facilitates filtering work orders according to their associated site.
-
Location Filter: Helps in filtering work orders based on their location. This filter is dependent on the site filter.
-
Steps to Use the Filter
Click Filter button.
-
Click on the specific filter field (e.g., Status, Priority, Site, or Location).
-
Individually check-in the boxes corresponding to the desired options. Example: For Status, check-in options such as Open, In Progress, or Closed.
-
Click on the search box inside the filter drop-down menu to search for a required filter.
-
Click Done or outside the filter field to save the selection. The filter will automatically update the displayed work orders based on the selected filters.
Steps to Reset the Filter
Click on the Reset Filter icon. The filter will be reset to its initial stage.
My Work Center Sort
The use of Sort in the My Work Centre Widget enables users to efficiently sort work orders based on various criteria: Due Date, Priority, Status and Work order ID.
Access Sort in My Work Center Widget
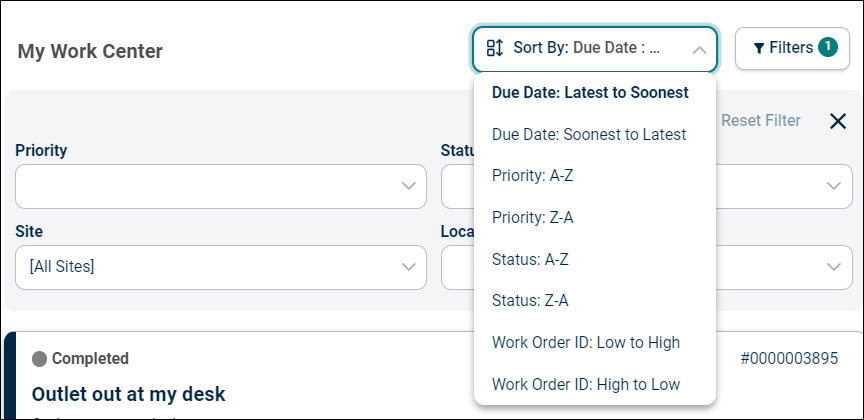
The sort offers easy sorting of the work order inside the My Work Centre Widget.
-
Click Sort button to access the Filter drop-down menu.
-
Access four sorting options:
-
Due Date (Latest to Soonest and Soonest to Latest): Allows users to sort work orders based on the due date. Users have two options to sort work orders using due date. This is the default sorting option.
-
Priority (A to Z/ Z to A): Enables sorting work orders by priority.
-
Status (A to Z/ Z to A): Facilitates sorting work orders according to the status.
-
Work Order ID: Helps in sorting work orders based on the work order ID.
-
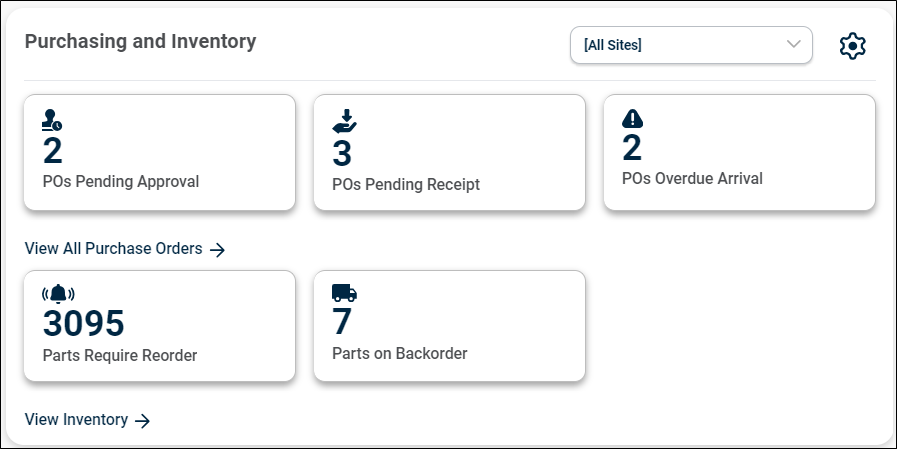
Purchasing and Inventory Widget
The Purchasing & Inventory Widget has been introduced to provide users with a quick and structured way to access critical Purchase Order (PO) and Inventory details related to purchasing and part reordering processes.
Widget divided into two sections
-
Purchasing Section – Focused on tracking purchase orders.
-
Inventory Section – Focused on parts management and reordering.
Purchasing and Inventory Section – Cards & Data Logic
The Purchasing and Inventory Widget presents several cards for the management of purchase orders and parts, each focusing on key aspects of the purchasing process. Each card will show the number of items in the respective category, enabling users to quickly view the status of POs and parts related to their site. Clicking on the cards will navigate to the respective page.
The Purchasing Section contains three key cards
-
POs Pending Approval: Displays purchase orders with a Status Category of Pending.
-
POs Pending Receipt: Displays purchase orders with a Status Category of Received.
-
POs Overdue Arrival:
-
Displays purchase orders with a Status Category of Ordered.
-
Includes only purchase orders where DateExpected < Today.
-
The Inventory Section contains two key cards
-
Parts Require Reorder:
-
Displays parts that have fallen below the minimum reordering level and need to be reordered.
-
The logic remains the same as the old Dashboard.
-
-
Parts On Backorder: Displays parts that have been ordered but not yet received.
Site-Specific Filtering
The Purchasing and Inventory Widget includes a site selection filter, helps to view only the purchase and parts orders relevant to the chosen site.
-
Use the Site selection drop-down menu to select All Sites or Individual Site option.
-
Verify that the orders displayed in the Widget correspond only to the selected site.
-
If All Sites is selected, orders from all sites should be visible.
-
If an individual site is selected, only orders tied to that site should be shown.
-

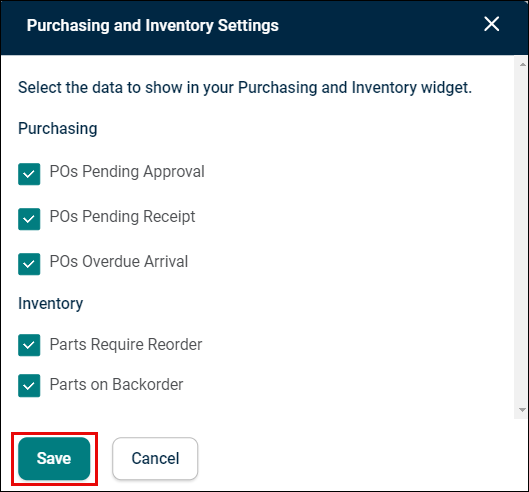
Card Customization Functionality
The Purchase and Inventory Widget includes Customization Functionality, allowing users to choose which purchase inventory criteria cards they want to display.
Customization Steps
-
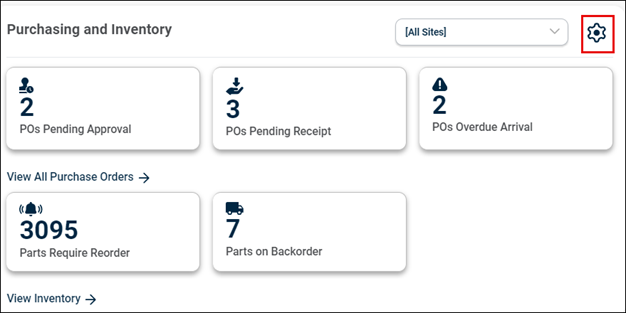
Click Settings icon to open the customization menu.
-
The Purchasing and Inventory Settings screen appears. Check in/off purchase or inventory order categories to display or hide specific cards. (E.g., Users focused on backorders may opt to display only the Parts On Backorder card.)
-
Click Save button.
Edit Widget
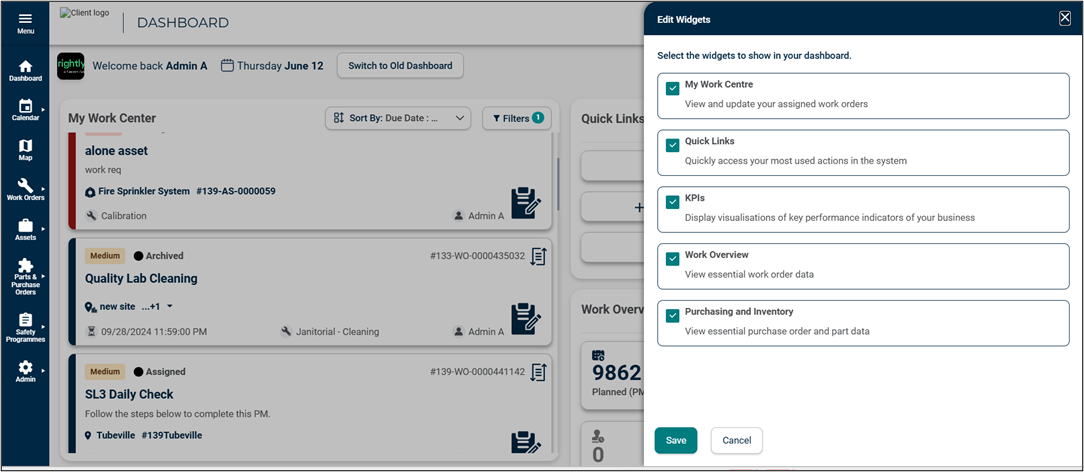
The new Edit Widget functionality allows users to customize their Dashboard by showing or hiding specific widgets as per their preference. This enhances the user experience by ensuring that only relevant Widgets are displayed, reducing clutter and improving efficiency.
-
Click on the edit widget icon on the Dashboard. The Edit Widgets screen appears, listing all available Widgets.
-
Check-in the box next to a Widget to display it on the Dashboard.
-
Check-off the box to hide the Widget from view.
-
Once the selection is made, click Save button to apply changes.
-
The Dashboard will refresh, and update based on the selected Widgets.
-
*Note: Hidden Widgets can be re-enabled anytime by accessing the edit widget option again. Widget customization is user-specific and will not impact other users' Dashboards.
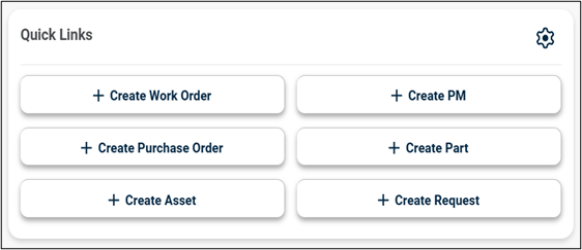
Quick Links
The new Quick Link Widget functionality allows users to create Work Order, PM, Purchase Order, Part, Asset and Request directly from the Dashboard.
-
Click on the cards present inside the Widget to go to the respective page. E.g., Clicking + Create Work Order button will navigate to the new Work Order form.
-
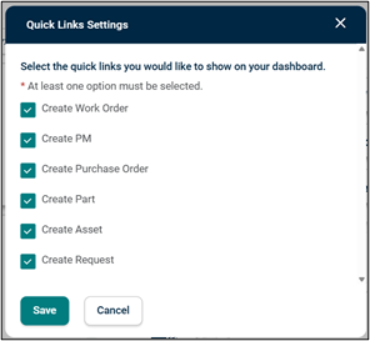
Click on the setting icon to access quick link settings to customize the number of cards to be shown inside the widget.
KPI
The Key Performance Indicators (KPI) are quantifiable measures that show how effectively your organization is achieving key business objectives. They are commonly used to evaluate the level of success of a particular activity or progress toward a desirable goal. Asset Essentials provides the ability to create custom KPIs that can be viewed from the Dashboard.
-
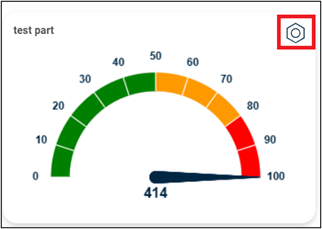
Click on the KPI Widget card to navigate to the respective page to access the complete date.
-
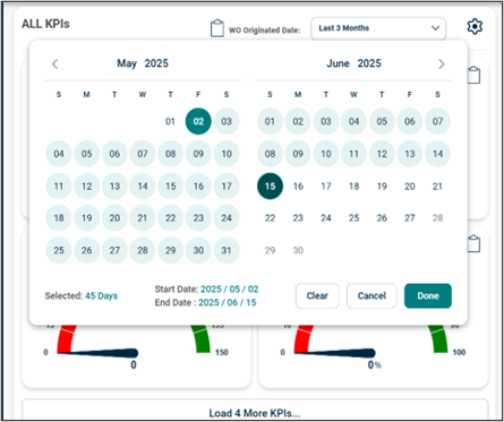
Click Load More button to load the remaining KPIs inside the widget. Each time only 4 KPIs will get loaded.
-
Work order KPI and Parts KPI are differentiated by two different icons as shown respectively. *Note: For creating a new KPI, please follow the Help guide section available in AE.
IMAGE
Date-Specific Filtering
The KPI Widget includes a WO originated date selection filter, helps to view only the KPIs relevant to the chosen date range. By default, Last 3 months date range is selected in the date selection filter. *Note The date filter present in My KPI page will only be used for old dashboard, to add date filter in new Dashboard KPI widget, use the date originated filter present in My KPI widget.
-
Click Date Filter.
-
Access the drop-down menu with multiple date options.
-
Choose the date range you want to select. None denotes all KPIs, and no date range is selected.
-
KPI cards inside the Widget will get updated according to the chosen date range.

KPI Setting
-
Click on the setting icon inside the KPI Widget.
-
Select the work source (Work Order and Parts) of the KPI you want to access.
-
Click Select All to access both work source KPIs.
-
Click Save button to save the preference.
-
Click Cancel button to cancel and re-apply.

Rearranging Widgets with Drag and Drop
-
Click Rearrange button located at the top right of your screen.

-
Once enabled, all widgets on the page become movable. Drag and drop Widgets to your preferred position — either top to bottom or left to right.
-
Click Save Dashboard button at the top right to save the customized view.