Back to Asset Essentials Main Menu
Central Reporting Hub
Overview
This release provides access to the newly added Central Reporting Hub, the one-stop shop where access to canned reports of all data types (e.g., Work Orders, Assets, Parts/Inventory, etc.). This release also provides access to a handful of key reports covering insights related to work order management, preventative maintenance tracking/planning, labor costs, and inventory transactions.
The Reports menu item will appear in the navigation sidebar by default for all Administrator, Full User, and Specialty user types. The Request only user type does not have access to the Central Reporting Hub, and as such the Reports menu item does not appear in their sidebar.
Enabling Reports Menu
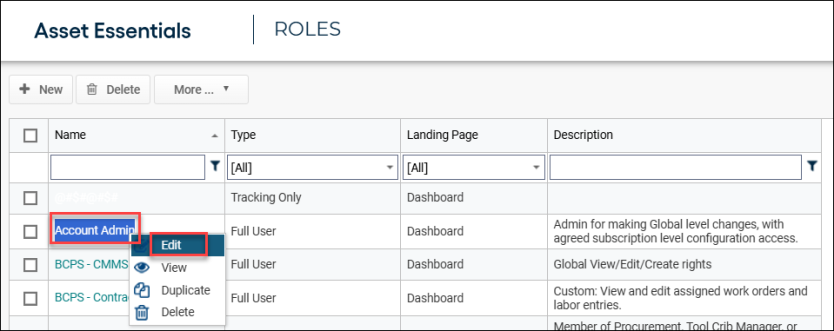
- Log into Asset Essentials.
- Click Admin, select Roles.
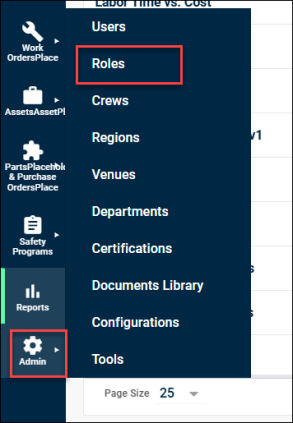
- Select Edit by right clicking on the applicable role.
- Scroll to the MENU ITEMS section.
- Toggle Reports checkbox on/off based on your preferences.
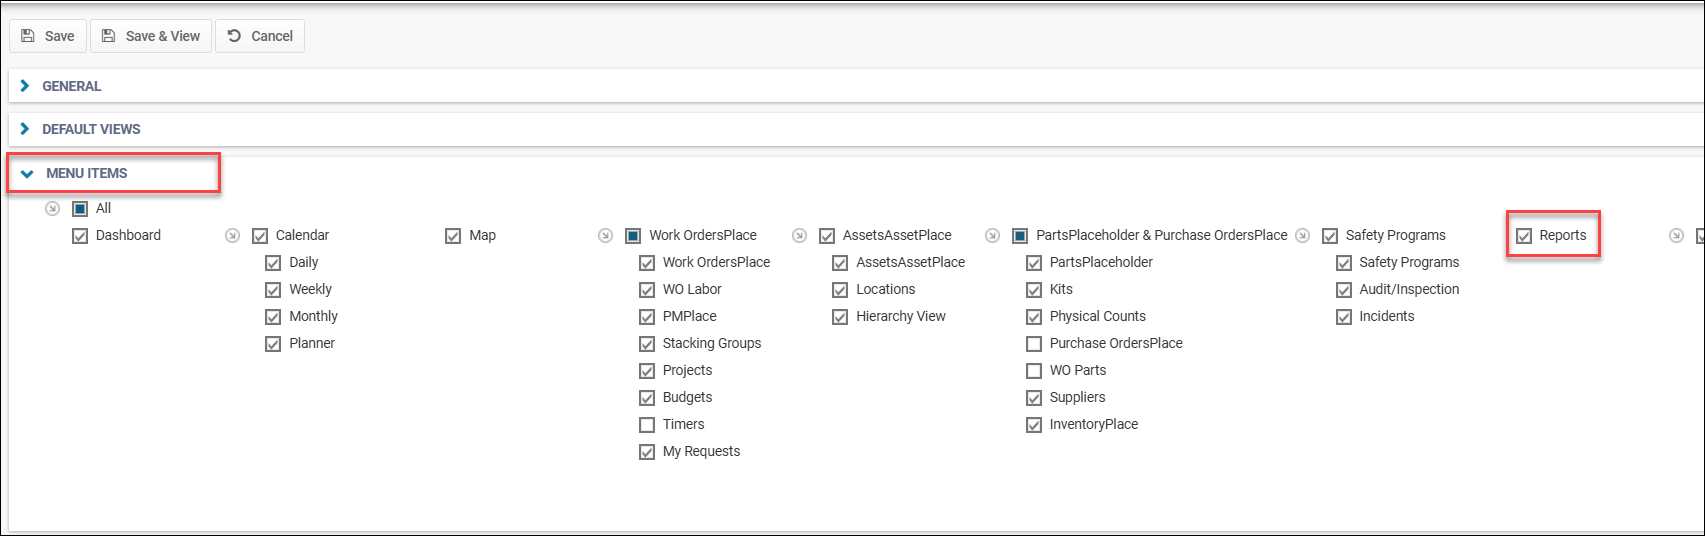
*Note: The Reports menu item only appears for Administrator, Full User, and Specialty user types. The changing role settings is only available to Enterprise clients, See the User Role help page for an example of this type of message.
Asset Essentials Sidebar Navigation
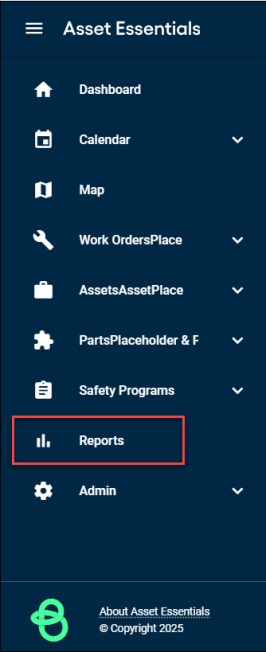
Given the Reporting feature flag is turned on, a new Reports menu item will now be available to add to the navigation sidebar of Asset Essentials, which allows access to the Central Reporting Hub that shows lists of all the newly revamped reports that are available to run.
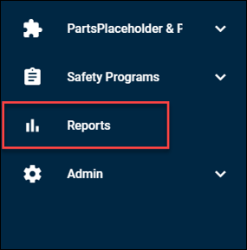
Accessing Reports in the Central Hub
- Navigate to Asset Essentials menu.
- Click Reports.
- The REPORTS screen appears listing all new reports available to run in Asset Essentials Central Reporting Hub. The reports are categorized by Type (Table vs. Dashboard) and Category fields with filtering capabilities.
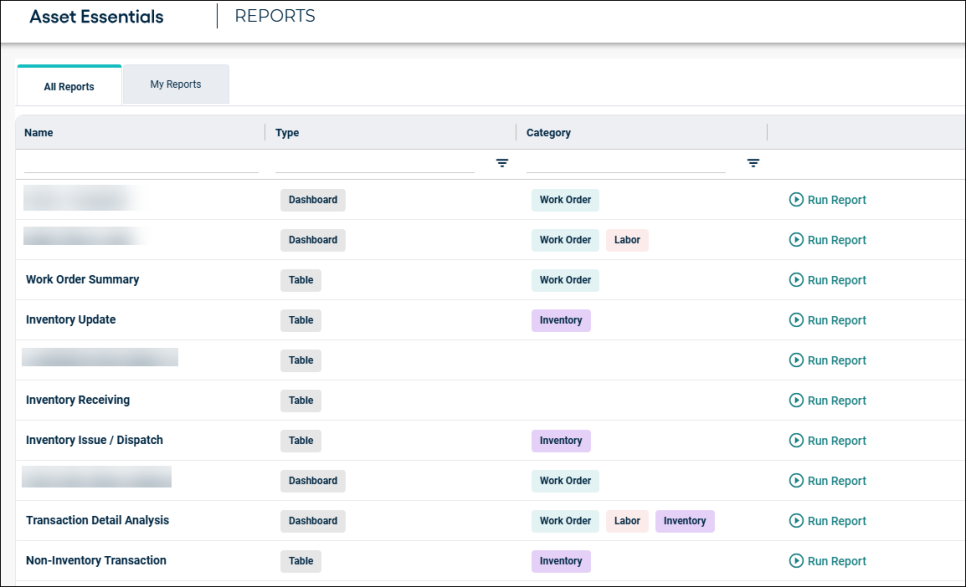
*Note: A user must have viewing permissions for at least one of a report’s categories to appear in their report list (e.g., A user who does not have permission to view work orders will not see reports whose only category is Work Order. A user who has permissions to view assets but not work orders will see reports with both the Assets and Work Order categories ).
Running and Exporting Reports
Follow the below instructions to run and export the reports. Is the type of report Table or Dashboard?
- Table – Proceed to Table Reports section.
- Dashboard – Skip to Dashboard Reports section.
Table Reports
Tabular reports contain basic maintenance insights in a table format, similar to Excel. These reports are able to be exported to CSV and Excel, while some tabular reports have a print-friendly version that may group insights by certain key metrics.
AE Transaction Detail
This report focuses on transactions involving Asset Equipment, including movement and usage data. Supports asset lifecycle tracking and utilization analysis.
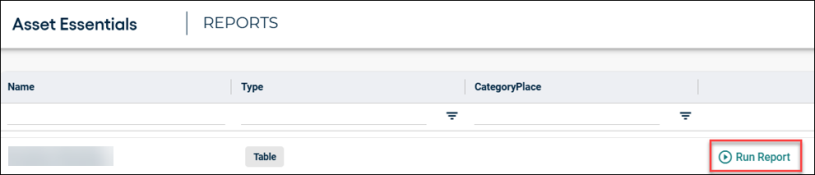
- Within REPORTS screen, go to AE Transaction Detail report, and then click Run Report.
- The following screen appears with customizing functionality:
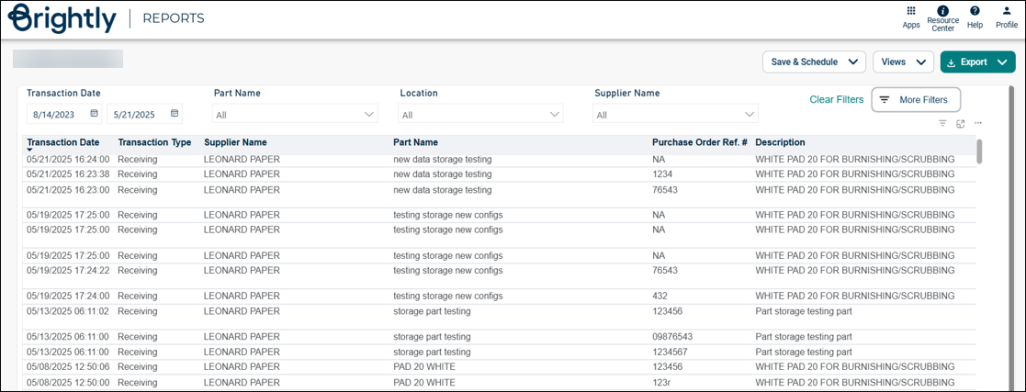
- Transaction Date: Select start and end date.
- Part Name: Click on the drop-down menu, select the applicable part name.
- Location: Click on the drop-down menu, select the applicable location.
- Supplier Name: Click on the drop-down menu, select the applicable location.
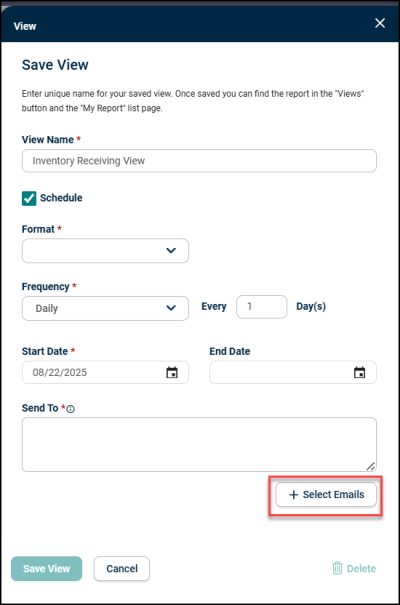
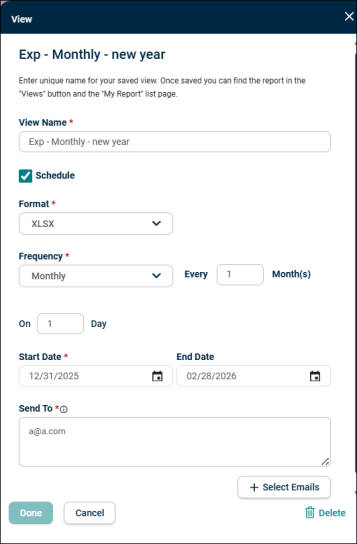
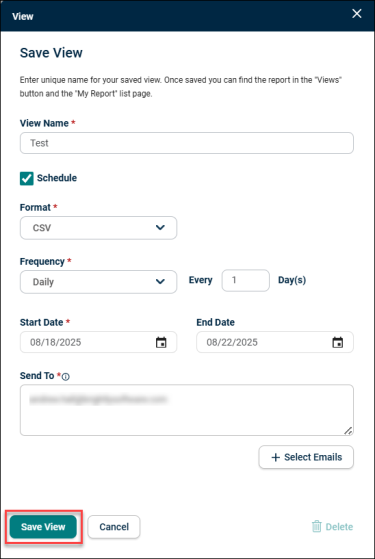
- Save & Schedule:
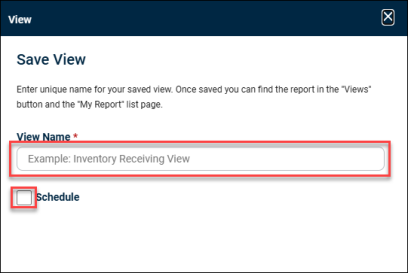
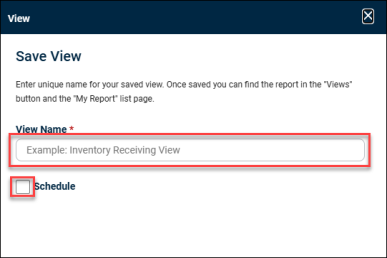
- Click Save & Schedule button, select Save New View.
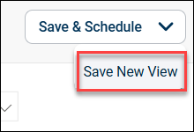
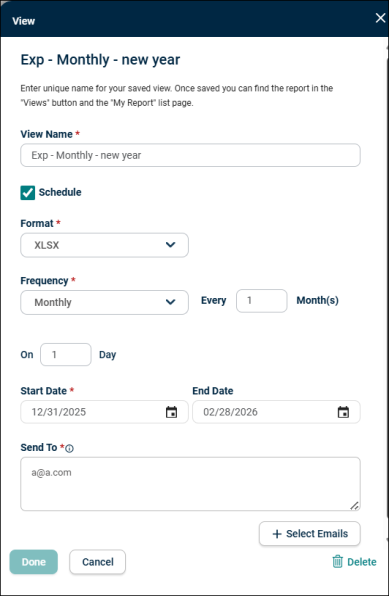
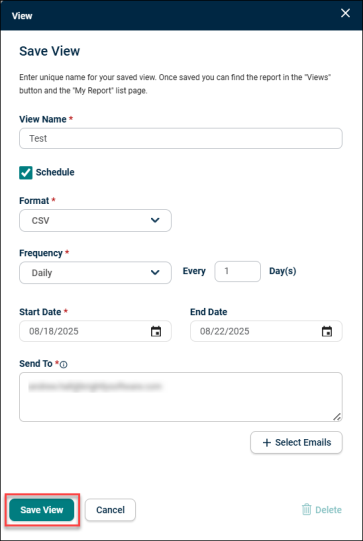
- The View screen appears, enter the view name in the View Name field, and then check in Schedule box.

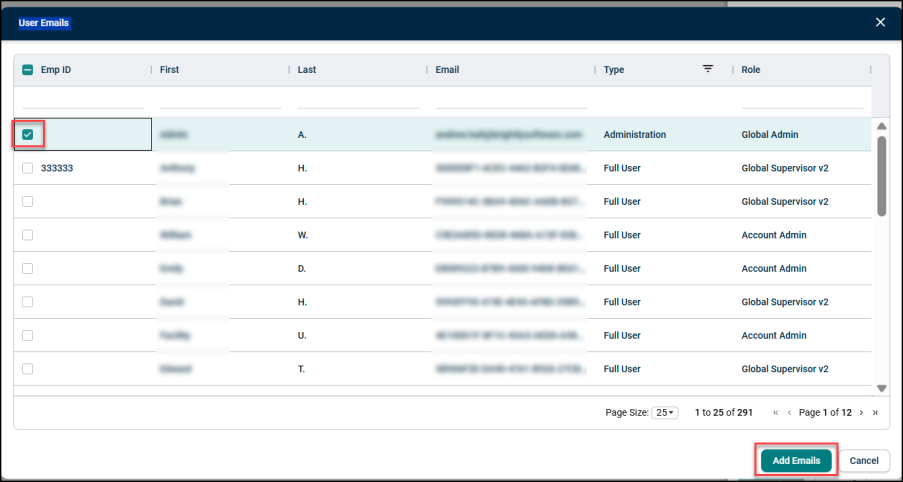
- The following fields will be populated, enter the appropriate information in the mandatory fields, and then click + Select Emails button.

- The User Emails screen appears, check in the appropriate email box you want to add, and then click Add Emails button.

- Click Save View button.

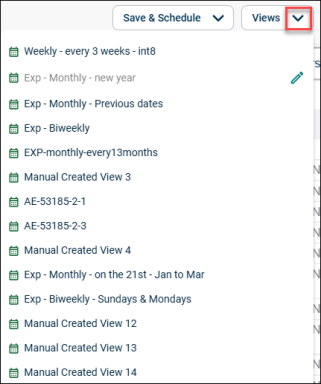
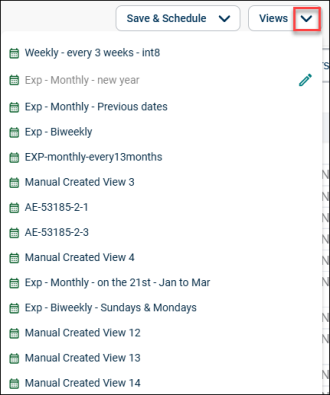
- Views:
- Click View drop-down menu, select the viewing date.
- Click on the pencil icon to further customize the viewing date, and then select Done button.

-
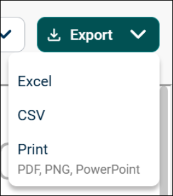
Export: Click Export drop-down menu, select desired option to export the report.
- Clear Filters: Click Clear Filters to clean up the selected items.
![]()
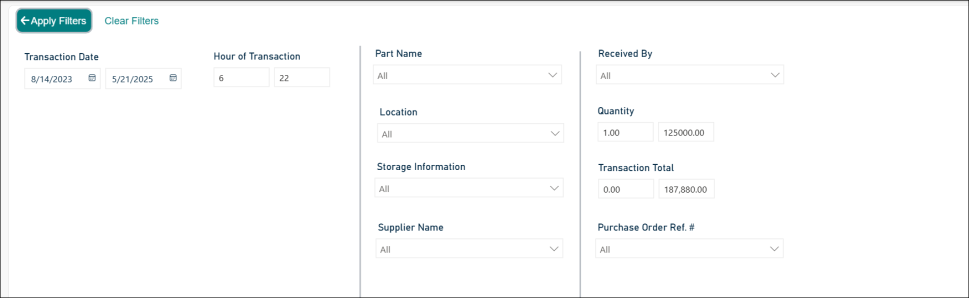
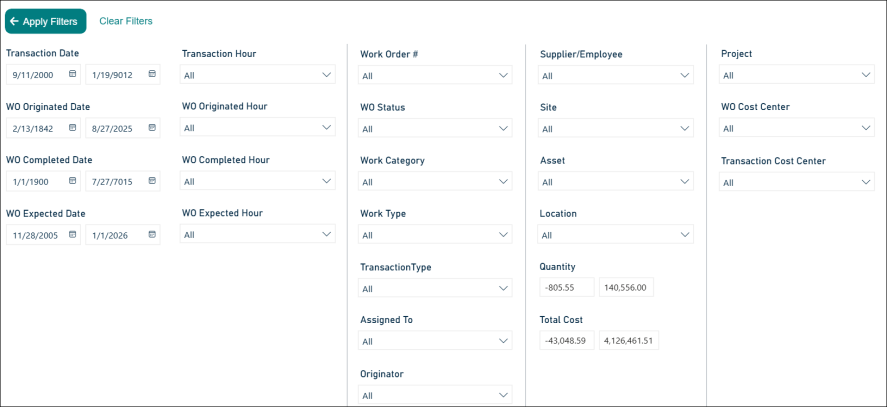
- More Filters:
- Click More Filters button for advanced filter options. Make the required changes, click Apply Filters button. Click Clear Filters to clean up the selected items.

- The following screen appears after making the changes in the More Filters.

Detailed Project Expenditure
This report provides detailed financial metrics for projects, including labor, materials, and overhead costs. Supports budget tracking and cost control.
- Within REPORTS screen, go to Detailed Project Expenditure report, and then click Run Report.
- The following screen appears with customizing functionality:
- Transaction Date: Select start and end date.
- Part Name: Click on the drop-down menu, select the applicable part name.
- Location: Click on the drop-down menu, select the applicable location.
- Supplier Name: Click on the drop-down menu, select the applicable location.
- Save & Schedule:
- Click Save & Schedule button, select Save New View.
- The View screen appears, enter the view name in the View Name field, and then check in Schedule box.
- The following fields will be populated, enter the appropriate information in the mandatory fields, and then click + Select Emails button.
- The User Emails screen appears, check in the appropriate email box you want to add, and then click Add Emails button.
- Click Save View button.
- Views:
- Click View drop-down menu, select the viewing date.
- Click on the pencil icon to further customize the viewing date, and then select Done button.
-
Export: Click Export drop-down menu, select desired option to export the report.
- Clear Filters: Click Clear Filters to clean up the selected items.
![]()
- More Filters:
- Click More Filters button for advanced filter options. Make the required changes, click Apply Filters button. Click Clear Filters to clean up the selected items.
- The following screen appears after making the changes in the More Filters.
Work Order Summary
This report summarizes work order metrics such as status, labor hours, and total costs. Helps teams monitor overall operational performance and resource utilization.
- Within REPORTS screen, go to Work Order Summary report, and then click Run Report.
- The following screen appears with customizing functionality:
- Transaction Date: Select start and end date.
- Part Name: Click on the drop-down menu, select the applicable part name.
- Location: Click on the drop-down menu, select the applicable location.
- Supplier Name: Click on the drop-down menu, select the applicable location.
- Save & Schedule:
- Click Save & Schedule button, select Save New View.
- The View screen appears, enter the view name in the View Name field, and then check in Schedule box.
- The following fields will be populated, enter the appropriate information in the mandatory fields, and then click + Select Emails button.
- The User Emails screen appears, check in the appropriate email box you want to add, and then click Add Emails button.
- Click Save View button.
- Views:
- Click View drop-down menu, select the viewing date.
- Click on the pencil icon to further customize the viewing date, and then select Done button.
-
Export: Click Export drop-down menu, select desired option to export the report.
- Clear Filters: Click Clear Filters to clean up the selected items.
![]()
- More Filters:
- Click More Filters button for advanced filter options. Make the required changes, click Apply Filters button. Click Clear Filters to clean up the selected items.
- The following screen appears after making the changes in the More Filters.
Detailed Location Expenditure
This report tracks asset-related expenditures by location, including maintenance and operational costs. Helps identify high-cost areas and optimize spending.
- Within REPORTS screen, go to Detailed Location Expenditure report, and then click Run Report.
- The following screen appears with customizing functionality:
- Transaction Date: Select start and end date.
- Part Name: Click on the drop-down menu, select the applicable part name.
- Location: Click on the drop-down menu, select the applicable location.
- Supplier Name: Click on the drop-down menu, select the applicable location.
- Save & Schedule:
- Click Save & Schedule button, select Save New View.
- The View screen appears, enter the view name in the View Name field, and then check in Schedule box.
- The following fields will be populated, enter the appropriate information in the mandatory fields, and then click + Select Emails button.
- The User Emails screen appears, check in the appropriate email box you want to add, and then click Add Emails button.
- Click Save View button.
- Views:
- Click View drop-down menu, select the viewing date.
- Click on the pencil icon to further customize the viewing date, and then select Done button.
-
Export: Click Export drop-down menu, select desired option to export the report.
- Clear Filters: Click Clear Filters to clean up the selected items.
![]()
- More Filters:
- Click More Filters button for advanced filter options. Make the required changes, click Apply Filters button. Click Clear Filters to clean up the selected items.
- The following screen appears after making the changes in the More Filters.
Detailed Sub location Expenditure
This report offers granular expenditure data at sub-location levels. Useful for pinpointing specific cost drivers within broader locations.
- Within REPORTS screen, go to Detailed Sub location Expenditure report, and then click Run Report.
- The following screen appears with customizing functionality:
- Transaction Date: Select start and end date.
- Part Name: Click on the drop-down menu, select the applicable part name.
- Location: Click on the drop-down menu, select the applicable location.
- Supplier Name: Click on the drop-down menu, select the applicable location.
- Save & Schedule:
- Click Save & Schedule button, select Save New View.
- The View screen appears, enter the view name in the View Name field, and then check in Schedule box.
- The following fields will be populated, enter the appropriate information in the mandatory fields, and then click + Select Emails button.
- The User Emails screen appears, check in the appropriate email box you want to add, and then click Add Emails button.
- Click Save View button.
- Views:
- Click View drop-down menu, select the viewing date.
- Click on the pencil icon to further customize the viewing date, and then select Done button.
-
Export: Click Export drop-down menu, select desired option to export the report.
- Clear Filters: Click Clear Filters to clean up the selected items.
![]()
- More Filters:
- Click More Filters button for advanced filter options. Make the required changes, click Apply Filters button. Click Clear Filters to clean up the selected items.
- The following screen appears after making the changes in the More Filters.
PM Range Summary
This report helps in preventive maintenance work orders within a selected date range. Tracks compliance with scheduled maintenance and recurring tasks.
- Within REPORTS screen, go to PM Range Summary report, and then click Run Report.
- The following screen appears with customizing functionality:
- Transaction Date: Select start and end date.
- Part Name: Click on the drop-down menu, select the applicable part name.
- Location: Click on the drop-down menu, select the applicable location.
- Supplier Name: Click on the drop-down menu, select the applicable location.
- Save & Schedule:
- Click Save & Schedule button, select Save New View.
- The View screen appears, enter the view name in the View Name field, and then check in Schedule box.
- The following fields will be populated, enter the appropriate information in the mandatory fields, and then click + Select Emails button.
- The User Emails screen appears, check in the appropriate email box you want to add, and then click Add Emails button.
- Click Save View button.
- Views:
- Click View drop-down menu, select the viewing date.
- Click on the pencil icon to further customize the viewing date, and then select Done button.
-
Export: Click Export drop-down menu, select desired option to export the report.
- Clear Filters: Click Clear Filters to clean up the selected items.
![]()
- More Filters:
- Click More Filters button for advanced filter options. Make the required changes, click Apply Filters button. Click Clear Filters to clean up the selected items.
- The following screen appears after making the changes in the More Filters.
Inventory Receiving
This report logs incoming inventory items with details like quantity, source, and date received. Ensures accurate stock levels and supports reconciliation.
- Within REPORTS screen, go to Inventory Receiving report, and then click Run Report.
- The following screen appears with customizing functionality:
- Transaction Date: Select start and end date.
- Part Name: Click on the drop-down menu, select the applicable part name.
- Location: Click on the drop-down menu, select the applicable location.
- Supplier Name: Click on the drop-down menu, select the applicable location.
- Save & Schedule:
- Click Save & Schedule button, select Save New View.
- The View screen appears, enter the view name in the View Name field, and then check in Schedule box.
- The following fields will be populated, enter the appropriate information in the mandatory fields, and then click + Select Emails button.
- The User Emails screen appears, check in the appropriate email box you want to add, and then click Add Emails button.
- Click Save View button.
- Views:
- Click View drop-down menu, select the viewing date.
- Click on the pencil icon to further customize the viewing date, and then select Done button.
-
Export: Click Export drop-down menu, select desired option to export the report.
- Clear Filters: Click Clear Filters to clean up the selected items.
- More Filters:
- Click More Filters button for advanced filter options. Make the required changes, click Apply Filters button. Click Clear Filters to clean up the selected items.
- The following screen appears after making the changes in the More Filters.
Inventory Issue
This report tracks issued inventory items by type, quantity, and destination. It helps in monitoring usage trends and preventing stockouts.
- Within REPORTS screen, go to Inventory Issue report, and then click Run Report.

- The following screen appears with customizing functionality:

- Transaction Date: Select start and end date.
- Part Name: Click on the drop-down menu, select the applicable part name.
- Location: Click on the drop-down menu, select the applicable location.
- Supplier Name: Click on the drop-down menu, select the applicable location.
- Save & Schedule:
- Click Save & Schedule button, select Save New View.

- The View screen appears, enter the view name in the View Name field, and then check in Schedule box.
- The following fields will be populated, enter the appropriate information in the mandatory fields, and then click + Select Emails button.
- The User Emails screen appears, check in the appropriate email box you want to add, and then click Add Emails button.
- Click Save View button.
- Views:
- Click View drop-down menu, select the viewing date.
- Click on the pencil icon to further customize the viewing date, and then select Done button.
-
Export: Click Export drop-down menu, select desired option to export the report.

- Clear Filters: Click Clear Filters to clean up the selected items.
- More Filters:
- Click More Filters button for advanced filter options. Make the required changes, click Apply Filters button. Click Clear Filters to clean up the selected items.
- The following screen appears after making the changes in the More Filters.

Inventory Update
This report reflects inventory adjustments, transfers, and corrections. Maintains data accuracy and supports audit readiness.
- Within REPORTS screen, go to Inventory Update report, and then click Run Report.
- The following screen appears with customizing functionality:

- Transaction Date: Select start and end date.
- Part Name: Click on the drop-down menu, select the applicable part name.
- Location: Click on the drop-down menu, select the applicable location.
- Supplier Name: Click on the drop-down menu, select the applicable location.
- Save & Schedule:
- Click Save & Schedule button, select Save New View.

- The View screen appears, enter the view name in the View Name field, and then check in Schedule box.
- The following fields will be populated, enter the appropriate information in the mandatory fields, and then click + Select Emails button.

- The User Emails screen appears, check in the appropriate email box you want to add, and then click Add Emails button.

- Click Save View button.
- Views:
- Click View drop-down menu, select the viewing date.
- Click on the pencil icon to further customize the viewing date, and then select Done button.

-
Export: Click Export drop-down menu, select desired option to export the report.

- Clear Filters: Click Clear Filters to clean up the selected items.
- More Filters:
- Click More Filters button for advanced filter options. Make the required changes, click Apply Filters button. Click Clear Filters to clean up the selected items.

- The following screen appears after making the changes in the More Filters.

Non-Inventory Transaction
This report logs incoming inventory items with details like quantity, source, and date received. Ensures accurate stock levels and supports reconciliation.
- Within REPORTS screen, go to Non-Inventory Transaction report, and then click Run Report.
- The following screen appears with customizing functionality:
- Transaction Date: Select start and end date.
- Part Name: Click on the drop-down menu, select the applicable part name.
- Location: Click on the drop-down menu, select the applicable location.
- Supplier Name: Click on the drop-down menu, select the applicable location.
- Save & Schedule:
- Click Save & Schedule button, select Save New View.
- The View screen appears, enter the view name in the View Name field, and then check in Schedule box.
- The following fields will be populated, enter the appropriate information in the mandatory fields, and then click + Select Emails button.
- The User Emails screen appears, check in the appropriate email box you want to add, and then click Add Emails button.
- Click Save View button.
- Views:
- Click View drop-down menu, select the viewing date.
- Click on the pencil icon to further customize the viewing date, and then select Done button.
-
Export: Click Export drop-down menu, select desired option to export the report.
- Clear Filters: Click Clear Filters to clean up the selected items.
- More Filters:
- Click More Filters button for advanced filter options. Make the required changes, click Apply Filters button. Click Clear Filters to clean up the selected items.
- The following screen appears after making the changes in the More Filters.
Dashboard Reports
Dashboard reports are more visual-heavy and contain charts/graphics relating to the maintenance insights. These reports are able to be exported to PDF, PNG, and PowerPoint files.
Labor Cost vs Time
This report compares technician labor hours against associated labor costs. Supports analysis of workforce efficiency and cost-effectiveness.
- Within REPORTS screen, go to Labor Cost vs. Time report, and then click Run Report.
![]()
- The following screen appears with customizing functionality:
![]()
- Transaction Date: Select the transaction start and end date.
- WO Completed Date: Select the work order start and end date.
- Transaction Type: Click on the drop-down menu, select the transaction type.
- Location: Click on the drop-down menu, select the applicable location.
- Save & Schedule: Same as table reports.
- Views: Same as table reports.
- Export: Click Export drop-down menu, select the desired option to export the report.

- Clear Filters: Same as table reports.
- More Filters: Select the desired filter options, click Apply Filters. Click Clear Filters to clean up the selected items.
Work Order Status Analysis
This report focuses on breaking down work orders by status categories like open, in progress, and closed. Enables identification of delays and workflow bottlenecks.
- Within REPORTS screen, go to Work Order Status Analysis report, and then click Run Report.
![]()
- The following screen appears with customizing functionality:
![]()
- Transaction Date: Select the transaction start and end date.
- WO Completed Date: Select the work order start and end date.
- Transaction Type: Click on the drop-down menu, select the transaction type.
- Location: Click on the drop-down menu, select the applicable location.
- Save & Schedule: Same as table reports.
- Views: Same as table reports.
- Export: Click Export drop-down menu, select the desired option to export the report.
- Clear Filters: Same as table reports.
- More Filters: Select the desired filter options, click Apply Filters. Click Clear Filters to clean up the selected items.
Transaction Detail Analysis
This report focuses on transactions involving Asset Equipment, including movement and usage data. Supports asset life-cycle tracking and utilization analysis.
- Within REPORTS screen, go to Transaction Detail Analysis report, and then click Run Report.
- The following screen appears with customizing functionality:
- Transaction Date: Select the transaction start and end date.
- WO Completed Date: Select the work order start and end date.
- Transaction Type: Click on the drop-down menu, select the transaction type.
- Location: Click on the drop-down menu, select the applicable location.
- Save & Schedule: Same as table reports.
- Views: Same as table reports.
- Export: Click Export drop-down menu, select the desired option to export the report.
- Clear Filters: Same as table reports.
- More Filters: Select the desired filter options, click Apply Filters. Click Clear Filters to clean up the selected items.
Active/Completed WO
This report tracks the number and status of active versus completed work orders. Useful for identifying backlog and completion rates..
- Within REPORTS screen, go to Active/Completed WO report, and then click Run Report.
![]()
- The following screen appears with customizing functionality:
![]()
- Transaction Date: Select the transaction start and end date.
- WO Completed Date: Select the work order start and end date.
- Transaction Type: Click on the drop-down menu, select the transaction type.
- Location: Click on the drop-down menu, select the applicable location.
- Save & Schedule: Same as table reports.
- Views: Same as table reports.
- Export: Click Export drop-down menu, select the desired option to export the report.
- Clear Filters: Same as table reports.
- More Filters: Select the desired filter options, click Apply Filters. Click Clear Filters to clean up the selected items.
